Showing posts with label Hazel & Ruby. Show all posts

Wednesday, August 6, 2014

Follow Your Heart

Hi everyone
Sharmaine here with another page from my art journal.

IMG_3916

The X-Press It Wide Glue Marker was very handy for adding some strips of tissue paper to my pages.

IMG_3918

I just tore strips of Hazel & Ruby tissue paper and stuck them down as my foundation.

IMG_3921

I then covered the paper with some yellow paint

IMG_3924

and some thin strips of Hazel & Ruby washi tape.

IMG_3929

Next I used some Chromacryl texture paste with a stencil.

IMG_3932

Before stamping with a FabScraps chipboard (as I did on this page)

IMG_3933

The image didn’t stamp completely but I worked with that.
I love the sneaky bits of white and I added some more paint to create a skirt.
I added some sequins to the skirt, using the X-Press It Glue Marker.

IMG_3934

I also used the X-Press It Glue Pen to add some spots of glue to a FabScraps butterfly, before adding some glitter.

IMG_3936

The results are texture

IMG_3940

IMG_3942

and sparkle.

IMG_3943

IMG_3944


SharmaineKruijver_XPressIt_JournalPage

Have a creative week
Sharmaine.

Pin It

Wednesday, July 9, 2014

Journal To The Stars And Back

Hi there, Sharmaine here! Guess what?!  It’s time for a blog hop! Together our team of designers have created some really fun projects using some of our favourite products and the best part is that you have OVER TEN opportunities to win!

When asked what my favourite X-Press It product is I always find it hard to pick.
So I thought I would do a post using some of my favourites.
The first is the Blending Journal.
IMG_3224
I love the sturdy pages and the ring bound spine means I can fill it up with lots of layers and it has loads of give.
For this page I layered up some strips of FabScraps pattern paper and gesso.
I then stamped and covered the lot with some green Atelier Free Flow Acrylic paint (also from X-Press It).
IMG_3225
I then added some stars with a stencil and some gesso, which I then covered with some glitter.
IMG_3229
Next I used a FabScraps chipboard piece as a stamp.
This is a simple task of covering the chipboard with paint
IMG_3228
and then stamping.
IMG_3230
Another fabulous X-Press It product is the Clear Gel Glue.
I used it to adhere some Hazel & Ruby sequins to my page.
IMG_3231
And lastly my all time favourite X-Press It product, double sided tape.
Ever since I started scrapbooking, back in 2005, the X-Press It double sided tape has been my trusty friend.
IMG_3232
I now use the 3mm for all my journal strips and that’s what I did here.

I hope this inspires you to create and to see that X-Press It have a huge range of products that can help you to be creative.

So.. do you want to win some goodies of your own to play with?
We want to know what inspires you! Leave a comment on this post and you could win an awesome bundle of goodies like this one.*

For more oppertunities to win, make sure you hop over to the other blogs and The Inspiration Lane facebook page where you could win the goodies above, as well as these AMAZING Copic Sets!

The next stop is Edna's Blog and be sure to visit all of the other blogs too!
Pin It

Wednesday, June 11, 2014

Sticky Barc Cards

Hello crafty people! It's Teresa here, and I'm excited to bring you a couple of cards I made using the amazing Sticky Barc.

This amazing product is really actual wood! It's sliced extra thin, making it flexible and easy to cut with any die. It also loves being coloured and today I've used Copic markers. Being translucent, the natural wood grain pattern still shows through.

Here's the first card:


 First of all, I cut a piece of White Birch Sticky Barc to 7.5 x 9.5 cm and die cut the silhouette and wreath from it:


Next I coloured the individual parts with a different Earth tone Copic marker. I left the silhouette shape uncoloured for contrast:


I assembled the card using some double sided tape to adhere Hazel and Ruby Crazy for Chevy wrapping paper for the card front. Adding the Sticky Barc to the card was a simple matter of removing the backing paper - this stuff is also adhesive! I wanted to create a parquetry effect, so I added a couple of coats of Tripletac for shine:

The sentiment at the bottom is some of the Colourbock Quotes Fat Roll Washi Tape stuck on some cardstock and attached to the card with foam tape.


Being so flexible, I wanted to see how Sticky Barc would cope with being embossed. Lovely! Here it is cut out with a feather die. I coloured one feather with a Copic marker and sponged some Distress Ink on the other to bring out the detail.


Thanks for stopping by! I hope you've seen what a wonderful product Sticky Barc is. I look forward to using it to add the on trend wood veneer look to many more projects.

Products I've used today:
Sticky Barc
Copic markers
Hazel and Ruby Crazy for Chevy wrapping paper
Tripletac
Foam tape
Colourbock Quotes Fat Roll Washi Tape 


Pin It

Wednesday, May 28, 2014

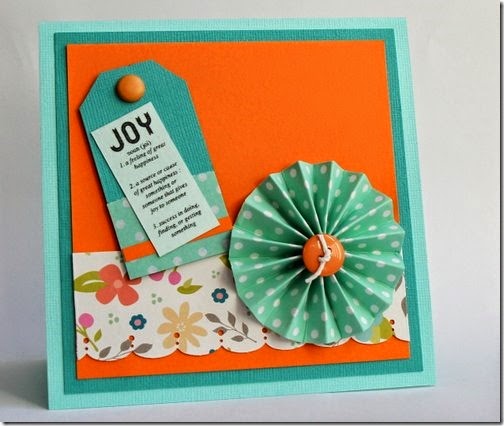
Define Joy – A Card Featuring Double Sided Adhesive Sheets

Joy - Robyn Wood
Hello! It’s Robyn Wood with you today sharing my first project on the X-Press It blog and I’m so happy to have been invited to join the team! I’m really looking forward to inspiring you. You can learn more about me in the welcome post on the Inspiration Lane blog.
My card today features X-Press It Double Sided Adhesive Sheets. These handy, sticky sheets are perfect to use when you need to stick tissue paper or lightweight paper as I have done for this project. The sheets come in a handy A4 size so are perfect for projects of all sizes.
The first step is to create a rosette which will be a feature on the card. Usually I would only create rosettes out of cardstock or heavy weight paper but this little trick with have you using our gorgeous Hazel & Ruby tissue paper as well!
1
· Trim a strip of X-Press It Double Sided Adhesive Sheet approx 4 cm wide from the long edge of the sheet. Expose one side of the adhesive and adhere to the long edge of Copic Blending Cardstock. Expose the second side of the adhesive and adhere a strip of Hazel & Ruby tissue paper cut to the same size. Trim the strip to 3 cm wide. The extra width in the beginning allows you some room to line up the pieces. The flimsy tissue paper is now reinforced by the cardstock making formation of the rosette easy.
to edit
· Score along the strip in 1 cm increments and then fold to make a concertina. Bring the ends together, making sure you match the folds and adhere with double sided high tack tape.
4
· Punch a 1 ¾” circle from the Double Sided Adhesive Sheets, remove one side of the adhesive and carefully set aside. Form the rosette by pushing the edges together into a circle shape and adhere using the punched circle of adhesive.
· Make a second strip about 4 cm wide using the Hazel & Ruby Pretty Floral paper and the technique described above. Use a border punch to give a decorative edge.
5
· Select a definition from the roll of Hazel & Ruby Define It Fat Roll Washi Tape and adhere to some coloured cardstock which tones with your base colours. Trim closely.
6
· Create a small tag approx. 4 cm x 7.5 cm using cardstock scraps and add a brad in place of a hole. Add some Double Side Adhesive Sheet to the back of a scrap of tissue paper that has been cut to fit the bottom of the tag. Tear one edge and adhere to tag. Overlay with a scrap of layer colour and trimmed definition.
· Using a 14 cm square card base, assemble card as shown. The tag is raised with X-Press It 6mm Foam Tape High Tack. A button tied with twine finishes the card.

Supplies:
X-Press It A4 Double Sided Tape Sheets
X-Press It 6mm Double Sided High Tack Tape
X-Press It 6mm Foam Tape High Tack
X-Press It Clear Gel Glue
Copic Blending Cardstock
Hazel & Ruby Pass the Tissue Teal Then/White Polka Dot
Hazel & Ruby Wrap It Up Pretty Floral Paper Roll
Hazel & Ruby Define It Fat Roll Washi Tape
Other – border punch, cardstock, brad, button & twine

I hope you have enjoyed learning how this project came together and one of the ways to use X-Press It A4 Double Sided Tape Sheets!

Robyn Pin It

Wednesday, March 12, 2014

Recycled Candle Holder

I just love being able to reuse household items to create something different.
I’m going to show you how I used X-Press It’s Triple Tac Glue to help create a candle holder.

SharmaineKruijver_XPressIt_TripleTacGlue6

The task called for a clean jar, tissue paper and some glue.

SharmaineKruijver_XPressIt_TripleTacGlue1

The jar would have been better if it was smaller but this one did the job.
You might see that i’ve used the gorgeous Hazel & Ruby tissue paper. It was perfect for this task.

SharmaineKruijver_XPressIt_TripeTacGlue2

It has a little more give than regular tissue paper and worked like a dream when I spread a layer of Triple Tac on the back.

SharmaineKruijver_XPressIt_TripleTac3

I then covered the jar with the paper. I wasn’t too fussed by the creases, they just add to the dreamy glow later!

SharmaineKruijver_XPressIt_TripleTacGlue4

I could have left it at this step or I could have added some twine, which could have been glued in place if you wanted.

SharmaineKruijver_XPressIt_TripleTacGlue5

But I wanted a different glow so I gave the tissue paper a wash with some water colour before adding the twine.

SharmaineKruijver_XPressIt_TripleTacGlue_Candle

The end result was a gorgeous glow.
Love that the Triple Tac dries clear and holds so well.
Can you imagine a row of these, in different sizes??
Or add some wire to create some hanging lanterns.
What great ideas have you got to revamp every day household items??

Sharmaine

Pin It