Showing posts with label X-Press It. Show all posts

Wednesday, February 11, 2015

X-Press It TripleTac Glue - Transfer Medium - Canvas

Today I am going to walk you through the process of using X-Press It’s TripleTac Glue as a transfer medium.
I could have also called this blog post “turning bad into good”!
I will show you how to work through a process, even when things don’t go quite how you expect and not giving up on a creative thought.
Using TripleTac as a transfer medium is one of my favourite techniques to play with.
It is super easy.
All you need is a canvas, X-Press It TripleTac Glue and something to transfer. It could be a pattern paper print, a print from a magazine or a photo.

SharmaineKruijver_XPressIt_TripleTac1

Firstly the photo.
The photo is printed straight onto copy paper.
Did I mention this technique was easy?
It doesn’t matter if it’s inkjet or laser, although laser works better.
You will notice my photo is on the dark side.
I wasn’t sure how it was going to look once transferred so used the whole process as an experiment.

Once you’ve selected your canvas and printed off a photo to fit
cover the photo side of the paper with TripleTac.

SharmaineKruijver_XPressIt_TripleTac2

Then place this side of the paper down on to your canvas.

SharmaineKruijver_XPressIt_TripleTac3

Allow the glue to dry, you can use a heat gun or allow to dry naturally (which can take a few hours but best results are from waiting 24 hours).

Now the great thing about this technique is that you can use the transfer medium on all sorts of things.
Transfer on to wood, cardboard or even cardstock. Anything flat that won’t move when you follow the next part of the process.

Once the glue is dry, use a paint brush and apply some water

SharmaineKruijver_XPressIt_TripleTac4

Then working in small sections start rubbing back the layer of paper to reveal the photo below.

 SharmaineKruijver_XPressIt_TripleTac5

By working in small sections you will soon see where the paper still needs rubbing back.

SharmaineKruijver_XPressIt_TripleTac6

Be careful not to rub too hard or too far as you will start to remove the photo.
You will see this happened in small sections of my canvas. You will see that I made this “mistake” work to my advantage.
Once you have removed the paper membrane from the whole canvas give it a clean with a damp cloth (I like to use my hand that has been dampened with a little water).
Allow to dry. Then cover with another coat of TripleTac to seal the print, making sure the coat is flat or it will dry streaky (as it did on my canvas…more on that below)

SharmaineKruijver_XPressIt_TripleTac7

And that’s the whole process.
Told you it was easy!
You can now add some paint around the edge of your canvas to finish it off.
For my canvas I took it a little step further.

SharmaineKruijver_XPressIt_TripleTac8

I have painted some layers around my photo and then covered the “white space” with some text.
I used the glue streaks to my advantage by highlighting them to emphasis texture and dimension.

SharmaineKruijver_XPressIt_TripleTac9

The result

SharmaineKruijver_XPressIt_LoveCanvas

Hopefully this inspires you to give this technique a go.
Why not grab your bottle of TripleTac and experiment.
Have a creative week
Sharmaine

Pin It

Wednesday, July 9, 2014

Journal To The Stars And Back

Hi there, Sharmaine here! Guess what?!  It’s time for a blog hop! Together our team of designers have created some really fun projects using some of our favourite products and the best part is that you have OVER TEN opportunities to win!
When asked what my favourite X-Press It product is I always find it hard to pick.
So I thought I would do a post using some of my favourites.
The first is the Blending Journal.
IMG_3224
I love the sturdy pages and the ring bound spine means I can fill it up with lots of layers and it has loads of give.
For this page I layered up some strips of FabScraps pattern paper and gesso.
I then stamped and covered the lot with some green Atelier Free Flow Acrylic paint (also from X-Press It).
IMG_3225
I then added some stars with a stencil and some gesso, which I then covered with some glitter.
IMG_3229
Next I used a FabScraps chipboard piece as a stamp.
This is a simple task of covering the chipboard with paint
IMG_3228
and then stamping.
IMG_3230
Another fabulous X-Press It product is the Clear Gel Glue.
I used it to adhere some Hazel & Ruby sequins to my page.
IMG_3231
And lastly my all time favourite X-Press It product, double sided tape.
Ever since I started scrapbooking, back in 2005, the X-Press It double sided tape has been my trusty friend.
IMG_3232
I now use the 3mm for all my journal strips and that’s what I did here.

I hope this inspires you to create and to see that X-Press It have a huge range of products that can help you to be creative.

So.. do you want to win some goodies of your own to play with?
We want to know what inspires you! Leave a comment on this post and you could win an awesome bundle of goodies like this one.*

For more oppertunities to win, make sure you hop over to the other blogs and The Inspiration Lane facebook page where you could win the goodies above, as well as these AMAZING Copic Sets!

The next stop is Edna's Blog and be sure to visit all of the other blogs too!
Pin It

Wednesday, November 27, 2013

Personalised Gift Bags featuring X-Press IT Double Sided Sheets

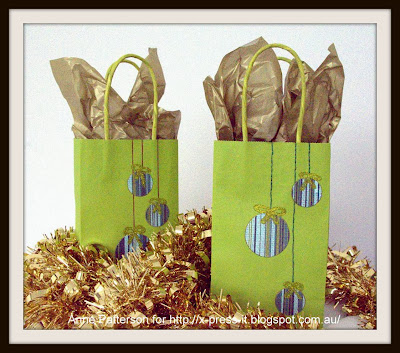
Hi Anne here today to share with you a really simple way of personalising gift bags, to give them that little something extra in this gift giving season.


I have found some simple Kraft gift bags, and have decorated them.  Here is how.


Taking your X-Press IT Double Sided Sheets, remove one side and adhere to your Patterned Paper.  This stuff is totally FABULOUS as it is like a GIANT piece of double sided tape.  It made my bag decorating process super easy.


I have used a 2" and 1" circle punch and easily punched out some quick circles.


Remove the other side of the doubled sided sheet, and adhere in place on the bag.


Using my X-Press it Thick Glue Pen, I drew some bows on the top of the circles.  Then sprinkled glitter onto the glue.


 There are two ways you can add the string.  The quick method, using a brown pen....


But as you know, I can't go past a good bit of needle work (which I have done on my other sample).


Products I have used in my project are:

X-Press It Double-Sided Sheets 
X-Press It Glue Marker
FabScraps Birds and Bees

Extra products:
Green Kraft Bags
Glitter
Brown pen or Green DMC Thread

So here they are, the finished gift bags.


Hope you liked my super easy bags and see that you could whip up a dozen of these in a very short time.  Thanks for Looking

Pin It

Thursday, October 31, 2013

Trick or Treat!?! Halloween Blog Hop!


Welcome to The X-Press It Halloween Hop! This is your chance to go trick or treating and win some X-Press It blog candy! You have 8 chances to win something from the X-Press It Jac O’lantern of goodies, like the new X-Press It Wide Glue Marker and Glue pen that I have used below! 


Simply leave a comment on each of the 5 blogs and our Facebook and Instagram pages. If you are just joining us on the hop, you are in the right place, this is the beginning! The next stop is Edna's Blog!

o   X-Press It Blog  TWO PRIZES!!
o   X-Press It Instagram (@xpressitau)

The hop closes at Midnight Sunday AEST (November 3, 2013) and is open to Australian residents only.

Thank you for stopping by, enjoy the hop and happy Halloween!Pin It

Monday, October 28, 2013

X-Press It Glue Marker Test Drive

A couple of weeks ago, we made a call out on the X-Press It Facebook page, for some clever crafters to try and review the new X-Press It Glue Markers. If you missed it, we have added a Wide and Pen Glue Marker to the X-Press It Range. We are super excited to share our first review with you, from Natalie.

Natalie's Review

I had such fun playing around with the glue markers. After a bit of experimenting with different techniques I found that they work really well with my super-fine glitter. So I gathered a few supplies, including all 3 X-Press It Glue Markers and went to work creating these fun and simple cards.


For my glitter technique I started with the Wide marker. Using a ruler I 'drew' a straight line of glue across the bottom of my card, sprinkled it with glitter and shook off the excess. I repeated this process with both the Regular and Fine markers. At first I was concerned the Fine marker wasn't working as I couldn't see the glue, but it was soon revealed to be all ok when I sprinkled the glitter over it. It was just so fine I couldn't make it out! But this stuff is super-strong too, and doesn't have a problem keeping the glitter in place. I think this will also be excellent for doing really small detail work, like filling in parts of stamped images.


Well, that gives me more ideas now... so I'm off to play. Thanks for letting me test drive your new products. I'm definitely going to be using them more!

-Natalie

You can see more of Natalies work on her blog: https://www.facebook.com/onescrappydoctor or blog: http://onescrappydoctor.blogspot.com/

Pin It