Showing posts with label X-Press It 3mm Double Sided Tape. Show all posts

Wednesday, June 10, 2015

X-Press It Double Sided Tape

 
X-Press It Double Sided Tape
  • Acid Free & solvent free
  • Easy to tear & apply by hand
  • Easy to peel liner
  • Heat resistant
  • Ideal for scrapbooking & papercraft
  • Great for embossing
  • Perfect to use on photos
  • Suits a wide range of surfaces
 X-Press It's Double sided tape is a great adhesive for quick, no-mess crafting.
 
 
Use it to adhere photos or paper.
 

Heat embossing becomes stress free, add a border with the 3mm double sided tape and some embossing powder.
 
 
Adding ribbon is quick and easy, run some 6mm double sided tape on the back of your ribbon.
You can then add a gathered look to your ribbon by simply adding some tucks, which all stay in place with the double sided tape.


Adding brads and embellishments becomes a breeze. Cut off the back of a brad and replace with a small section of double sided tape. No more cutting through your paper!


Pin It

Wednesday, August 20, 2014

Double Sided Bliss

Sometimes it is great to return to basics, to use what you have and to make the most of everyday supplies… and what better supply than double sided tape.  The great thing about X-Press It tapes is that they come in a variety of sizes, of course you can always split you tape to make smaller sizes, but the cost is moderate, so why not have a variety of sizes all pre-cut ready for use.

Today's project uses two sizes of tape 3mm and 6mm across the front of a card.  Of course I used double sided tape to adhere layers all the time, but thought it would be nice to see the tapes in action today for more display purposes…


Another fabby X-Press It range is that of Hazel & Ruby, especially their extra fat Washi Tapes, I have used a strip of washi on basic white card to form a band for the front of today's card project:


And then onto the fun of confetti, made from scraps of card that tie into the colours of the washi tape above, with a simple whole punch:


Once the confetti is prepared, it is time to run the tape across the front of the card base, heading in different directions with the two sizes of tape…. to make lift of easier I actually used my scalpel to remove the tape at each overlapping point:


Then I stuck the washi strip down and commenced dressing with the confetti, removing the 6mm tape first as I wanted to keep the confetti to the 6mm lines:


It really is as simple as giving the confetti a good rub, and the tape adheres and holds all the tiny pieces firmly in place:


This technique is repeated with fine glitter on the 3mm strips of tape:


And a little word die cut coloured with a Copic Marker to match the card/washi colours:


And then it was about finishing off the card with a flower and leaves…


Simple everyday products like double sided adhesive tape have many uses, try using your tapes on the outside of your projects next time you are in your creative space, it's affordable and fun!


Until next time, 


Pin It

Wednesday, July 9, 2014

Journal To The Stars And Back

Hi there, Sharmaine here! Guess what?!  It’s time for a blog hop! Together our team of designers have created some really fun projects using some of our favourite products and the best part is that you have OVER TEN opportunities to win!

When asked what my favourite X-Press It product is I always find it hard to pick.
So I thought I would do a post using some of my favourites.
The first is the Blending Journal.
IMG_3224
I love the sturdy pages and the ring bound spine means I can fill it up with lots of layers and it has loads of give.
For this page I layered up some strips of FabScraps pattern paper and gesso.
I then stamped and covered the lot with some green Atelier Free Flow Acrylic paint (also from X-Press It).
IMG_3225
I then added some stars with a stencil and some gesso, which I then covered with some glitter.
IMG_3229
Next I used a FabScraps chipboard piece as a stamp.
This is a simple task of covering the chipboard with paint
IMG_3228
and then stamping.
IMG_3230
Another fabulous X-Press It product is the Clear Gel Glue.
I used it to adhere some Hazel & Ruby sequins to my page.
IMG_3231
And lastly my all time favourite X-Press It product, double sided tape.
Ever since I started scrapbooking, back in 2005, the X-Press It double sided tape has been my trusty friend.
IMG_3232
I now use the 3mm for all my journal strips and that’s what I did here.

I hope this inspires you to create and to see that X-Press It have a huge range of products that can help you to be creative.

So.. do you want to win some goodies of your own to play with?
We want to know what inspires you! Leave a comment on this post and you could win an awesome bundle of goodies like this one.*

For more oppertunities to win, make sure you hop over to the other blogs and The Inspiration Lane facebook page where you could win the goodies above, as well as these AMAZING Copic Sets!

The next stop is Edna's Blog and be sure to visit all of the other blogs too!
Pin It

Wednesday, June 25, 2014

Be STILL my SILVER Loving Heart

This week I am having a lot of fun and many frivolous moment with Silver Leaf and the many ways to adhere it to your projects... enter X-Press It Adhesives….


I started this little mixed media with Hazel and Ruby Grey Polka Tissue Paper, adhered to the X-Press It Canvas with TripleTac.  A mixture of Texture Paste and Paint is then strategically placed using plastic stencils:


I LOVE Silver Leaf, it really adds an authentic wash of silver to our little patches of creativity and X-Press It Adhesives are the perfect way to mix up the application of this great product:

Let drops of Clear Gel Glue semi-dry, and brush Silver Leaf across their surface, for little raised bumped of silver loveliness:


Strips of Silver Leaf are added to the skirt pieces with X-Press It 3mm Double Sided Tape, the tape takes a bold impression of the Silver Leaf, a totally different finish to that achieved with the Clear Gel Glue:

The dress form on this piece has an extra little piece of Hazel & Ruby Tissue Paper adhered with TripleTac Glue.  I added a touch of red paint to white Gesso to give the chipboard a bit of colour, prior to adhering the tissue atop, this gave the text on the tissue more definition as it would be muted if adhereing direct to grey chipboard:


I have also taken bolder statements of Silver Leaf to the background, this was achieved with X-Press It Double Sided Adhesive Sheets, cutting these makes for even application of the adhesive:


Silver is the best finishing touch, and it is made super easy to apply with X-Press It adhesives, use what you have in your stash and give this great product a go, you won't be disappointed with the pep it puts in your step!


Here are the X-Press It Products I used in today's project:
X-Press It TripleTac Glue
X-Press It Clear Gel Glue
X-Press It 3mm Double Sided Tape
X-Press It Canvas
Hazel and Ruby Grey Polka Dot and Text Tissue Paper
Chroma Texture Paste
Jo Sonja White Gesso
Atelier Paint
Silver Leaf


I am sure I will be finding little slivers of Silver Leaf around my house for some time to come, but that's half the fun of it all.... Enjoy!


Pin It

Wednesday, December 4, 2013

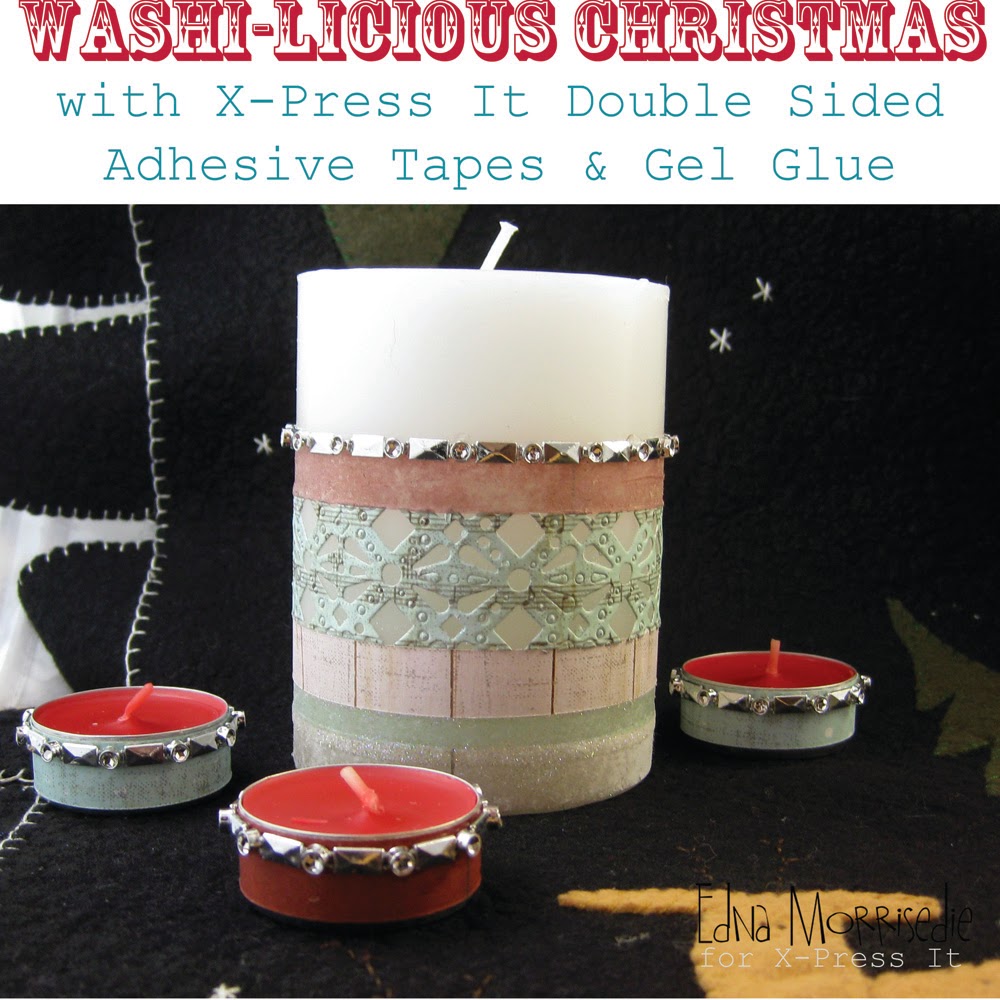
Washi-licious Christmas

It is definitely time to get the Christmas Decorations out, and this week I am revisiting faux washi tape techniques with the festivities of the season in mind.  It is amazing what a difference a few strips of paper can make to some pretty generic household candles, here is what I started with today:


I wanted to make one feature candle to sit in the middle of a table runner, and then to have different, but co-ordinated, tea-light candles to add to the mix.  With the feature candle I have used two different types of faux washi tape.  The first applies the tape directly to the paper, in multiple strips and then you splice away the strips of faux washi tape.


With one of the strips I have used a cutting die plate to give extra form to the design, the double sided adhesive cuts like butter in any die cutting machine and rarely leaves any residue behind.  This works the same with X-Press It Double Sided Adhesive Sheets too, I just used a double strip of adhesive tape today, the choice is yours.


The second technique sees strips of paper firmly pressed into strips of 12mm Double Sided Adhesive.  Once the paper is adhered, good side down, spritz or brush with water and rub away the backing paper to reveal the very fine upper layer of the paper.  This is like the paper transfer technique used with X-Press It TripleTac, but achieved with Double Sided Adhesive.   You need to be gentle with the rubbing, but the work is worth it to have a different texture of faux washi tape, with a transparent effect as your end result.

DIY Washi Tape Tutorial using X-Press IT Double Sided Adhesive Sheets, by Edna Morrisedie

For the tea light candles, the idea was to cover up the silver exterior of the candles with faux washi tape, co-ordinating the look with the feature candle.  This is simply achieved by using the tape to paper technique from above, I used 12mm double sided adhesive tape for these and it works a dream. 

I have added faux metal embellishment to the tea lights and around the top of the papers on the candle to bring them together.  I adhered these elements with X-Press it Clear Gel Glue

Once the strips of faux washi tape were ready I layered them up the base of the candle, leaving room to run 3mm double sided adhesive around the base of the candle, you can see it in place in this picture.  All I did to apply the glitter is simply remove the backing and rub some fine glitter into the adhered space to add yet another texture to your festive candle.


This is a quick and easy way to bring to add some festivity to your tables and general decorations this Christmas, or all year round with any types of paper and decorations that you prefer.  Double Sided Tape is my most used X-Press It product, its uses are endless, here is what I used in my project today:

X-Press It 3mm Double Sided Adhesive
X-Press It 6mm Double Sided Adhesive
X-Press It 12mm Double Sided Adhesive
FabScraps Papers
X-Press It Clear Gel Glue

And here are my candles out on my very precious felted table runner:


There is still plenty of inspiration to come from the X-Press It Blog this year, however, this is my last tutorial for this year, so may I say thanks for tuning in and all the best for the season... however you may celebrate it!  I look forward to seeing you all in 2014.... EDNA.Pin It

Wednesday, August 28, 2013

X-Press It Adhesives--A Sticky Delight!

Hello X-Press It Fans, it's time for another tutorial and this week we are celebrating everything sticky... and the wonderful adhesive qualities of X-Press It Tripletac Glue and Double-Sided Adhesives.  They are used globally for adhering paper to all of our layouts, cards and projects but have so many other great uses... today I provide you with a set of 3 little glass jars, all ready to colour co-ordinate with my extensive button collection... here is what I started with today:


I wanted to colour co-ordinate the lids to my buttons, but keep the details on the actual glass jars subtle, as I like to be able to see through to what is inside, so opted for flocked lids and clear glittered jars.  Flock is a mystery to many but really a fun medium... the real trick of the trade is to use an adhesive that has a thorough coverage but is still pliable for a little while after application, which is Tripletac to a T... this picture shows the flock as a first coat, persist with this textile, you do need multiple coats to get a finish with good coverage, just keep adding the TripleTac to the dried layers... eventually you will finish with a good coverage of "fluff"!


Then it was time to move on to the 3 glass jars, I thought it would be good to have a little variety, so opted for a criss-cross design on one, a ring design on another, and then a bottom section on the third.  In this picture you can see where I have used Double-Sided Tape on two of the jars (ring and criss-cross) and then a ring of masking tape (I used washi tape) a third of the way up the last jar.


The washi tape was used as a mask for the jar below... simply apply a good even coverage of Tripletac to the jar, overlapping the tape, sprinkle with a mountain of glitter and roll the jar to have the glitter travel across the glue and adhere to the jar....from there it is a simple case of pulling off the washi tape to reveal a perfect finished line to the glitter bottom on the jar, set aside to dry for 10 minutes or so...


Then it was onto the taped lines... with the ring design, I used three different sizes of double-sided tape 12mm, 6mm and 3mm.  Pull off backing from all three strips of adhesive at the one time and sprinkle over the glitter, once again rolling the jar to obtain coverage.  Make sure there is good coverage and that you rub the glitter into the tape.  Test that you have full coverage by running your finger around each of the rings, you shouldn't feel any stickiness along the way, if you do, simply add more glitter and rub in with force...


The most important thing to remember when securing glitter with double-sided tape is that to "earn real shine" you need to "buff the glitter", this means that you need to dust off the excess glitter and with the full pad of a finger tip rub the glitter into the tape, the more you rub the shinier the glitter will shine, this is because the particles make full contact with the tape, they adhere well and it also rids the line of tape of any excess glitter, allowing what is left to gain full light reflection, a subtle effect with this clear like glitter, more dramatic with a coloured glitter... try it, it will make you smile!!


With the criss-cross design, you will notice in the first picture that I had only applied tape in one direction, it is important to add the glitter over all the tape that you apply to the jar at the one time, this way you will minimise the "bumps" where the tapes cross over... pull off the backing from the first set of tapes, and then apply a new set of tapes in the opposite direction before adding any glitter.  Once again I have used the 3 sizes of tapes, two of each size in each direction, but you can mix this up to your liking...


Try your adhesives on all sorts of surfaces, there is plenty of variety across the X-Press It range, something for every surface... try all sorts of glass, put the glitter on the inside or the outside, full or partial coverage... looks great on vases, and very special on the outside of votive candle holders, especially when the candle light shines on through... for me though I am very happy with my co-ordinated button jars!

Here is what I used in my project today:

X-Press It Tripletac Glue
X-Press It Double-Sided Tape 3mm
X-Press It Double-Sided Tape 6mm 
X-Press It Double-Sided Tape 12mm
Glass Jars with screw top lids (the ones pickles come in)
Ultra-fine clear glitter
Flocking Powder


I hope you enjoyed this tutorial and try out this technique in your own creative space, enjoy!
Pin It