Showing posts with label Copic Markers. Show all posts

Wednesday, November 5, 2014

X-Press It: Glitter Paint

Today's tutorial takes us to a place close to many hearts…. glitter!  I am sure we all have a little, or not so little, stash of glitters in our drawers, some perhaps even unopened like the glitter I unearthed to make Glitter Paint!  It is a given in life, that all things are easier with X-Press It TripleTac, and in this case there is no need for expensive glitter glues, just supplies on hand and your trusty TripleTac… here is what I started with today:


You have seen me transform chipboard with Copic Markers before, below is the standard treatment of colouring the chipboard directly with a marker that co-ordinates with your patterned papers:


But when you are getting shabby, you don't necessarily want a matt coloured piece of chipboard, so get your TripleTac out and find a little dash of co-ordinated glitter, I use equal quantities of both, but you can mix the density of the glitter by changing the ratio of TripleTac to Glitter:


Simple mix the two together with a paint brush, the glitter paint will look milky as the TripleTac is white until it dries:


The it is a simple case of using your paint brush to apply the Glitter Paint to your pre-coloured chipboard, with this density of Glitter Paint I needn't have coloured the base first, but I always like to give some assurance just in case any little pieces are peeping through:


Disburse some of the left over Glitter paint on your planned embellishments and card layers, it helps to tie in the elements:


Then it is a simple case of putting your elements together on a card front:


From bland to glam in a matter of minutes:


Here are the X-Press It Products I used in my tutorial today:

X-Press It TripleTac Glue
FabScraps Crafty Girl Die Cut Chipboard
FabScraps Industrial Chic Collection


Pin It

Wednesday, July 23, 2014

Mixed Media Card with Blending Cardstock

Robyn Wood - Happy Birthday
Hello! It’s Robyn joining you today with a project featuring X-Press It Blending Card. Blending Card is perfect for this project as it can happily take a bit wet media without dissolving into a mushy mess. My card features an image stamped onto white tissue paper which is then collaged over stamped/painted Blending Cardstock and further embellished with Copics and glitter sprays.
  • Firstly cut some Blending Card to about A5 size. This is much larger than you need for the finished card but it will give you room to play with the background.
Robyn Wood - WIP
  • Using a flourish/swirl stamp, stamp each of the corners using two shades of blue archival ink.
  • Roughly paint the edges pale blue and the centre yellow.
  • Stamp dragonfly onto the middle of an A5 sized piece of white tissue paper using Momento Tuxedo Black ink.
Robyn Wood - WIP-001
  • Crinkle up the tissue paper, then adhere to Blending Card with X-Press It Triple Tac. Don’t smooth out all the wrinkles, they add lovely texture. Allow to dry well.
  • Colour dragonfly with Copic Markers, blending so that the outside of the wings are darker. Coat wings and dragonfly body with Glossy Accents to give them dimension and protect in the next step.
  • Spray with glitter spray – yellow in the centre and blue around the edges. Allow it to drip and spread, then dry well.
  • Trim image down to suit card front and sponge edges with blue archival ink. Embellish the dragonfly with glitter glue.
Robyn Wood - WIP-002
  • Layer image with blue cardstock and some patterned paper onto a 15cm square black card front using X-Press It Double Sided Tape. As the card may have buckled a little – use more double-sided tape than usual to ensure it lays flat on your card.
  • Add a layered greeting, raised with X-Press It Foam Tape and you are done!
Robyn Wood - Happy Birthday close
Supplies:
  • X-Press It Blending Card
  • X-Press It Triple Tac
  • X-Press It Double Sided Tape
  • X-Press It Foam Tape
  • Momento Ink Tuxedo Black
  • Copic Markers Y04, Y18, YR16
  • White tissue paper
  • Stampendous Dragonfly Vine, Fall Tendril, Happy Messages
  • Ranker Archival ink Manganese Blue & Forget-Me-Not
  • Ranger Glossy Accents
  • Acrylic paint in yellow/blue
  • Glitter glue, glitter sprays in yellow/blue
I hope you enjoyed learning how to create this lovely shimmery dragonfly card. I’d love to see your creations posted to our Facebook page if you make something similar.
Pin It

Wednesday, June 11, 2014

Sticky Barc Cards

Hello crafty people! It's Teresa here, and I'm excited to bring you a couple of cards I made using the amazing Sticky Barc.

This amazing product is really actual wood! It's sliced extra thin, making it flexible and easy to cut with any die. It also loves being coloured and today I've used Copic markers. Being translucent, the natural wood grain pattern still shows through.

Here's the first card:


 First of all, I cut a piece of White Birch Sticky Barc to 7.5 x 9.5 cm and die cut the silhouette and wreath from it:


Next I coloured the individual parts with a different Earth tone Copic marker. I left the silhouette shape uncoloured for contrast:


I assembled the card using some double sided tape to adhere Hazel and Ruby Crazy for Chevy wrapping paper for the card front. Adding the Sticky Barc to the card was a simple matter of removing the backing paper - this stuff is also adhesive! I wanted to create a parquetry effect, so I added a couple of coats of Tripletac for shine:

The sentiment at the bottom is some of the Colourbock Quotes Fat Roll Washi Tape stuck on some cardstock and attached to the card with foam tape.


Being so flexible, I wanted to see how Sticky Barc would cope with being embossed. Lovely! Here it is cut out with a feather die. I coloured one feather with a Copic marker and sponged some Distress Ink on the other to bring out the detail.


Thanks for stopping by! I hope you've seen what a wonderful product Sticky Barc is. I look forward to using it to add the on trend wood veneer look to many more projects.

Products I've used today:
Sticky Barc
Copic markers
Hazel and Ruby Crazy for Chevy wrapping paper
Tripletac
Foam tape
Colourbock Quotes Fat Roll Washi Tape 


Pin It

Wednesday, October 9, 2013

Delightful Dribbling with X-Press It Blending Card

Welcome back to the X-Press It Blog for another tutorial!  Today I am focussing on X-Press It Blending Card and the option for Direct Ink Application.  Most card makers used X-Press It to colour stamped images, today I am using a direct application of ink to the Blending Card in a saturated form…. Here is what I started today’s tutorial with:


Most of us know that X-Press It specifically developed their Blending Card for use with Copic Markers, it is bright white, robust (250gsm), silky smooth and a perfect surface for holding and blending the wonderful copic ink.  One of its defining characteristics is that it carries the ink all the way through the paper and allows for everything from top surface colouring through to full saturation.  I thought a little encouragement book would be a good way to show how delightful full colour saturation can be….

I started with a single A4 sheet of Blending Card, and used a scoring board to help with the book fold creases… here is a little link to a book fold diagram if you haven’t done one of these before; I put an extra cut in my fold method to allow for the thickness of X-Press It Blending Card, adjust to your preferences…


Once I had the book folds in the order that I wanted them to finish in I secured the book in this form with paper clips.  Then I prepared for inking by selecting three Blue|Green and one Yellow Various Inks.


From the top of the clipped card stack I dribbled ink, starting with the darker Blue|Green from the LHS, working down in depth of colour and across the top of the paper, finishing with the Yellow on the RHS… I chose these colours to represent sky and sunshine, but you could do this with any rainbow of colours.  You could add enough ink to cover all the Blending Card, or as I have done with varying amounts to form a dribbled look, but still leave open space.  It is a little messy, just remember to keep your card upright and let gravity do the work for you to get the ink to fall in between and down the pages…


I added some page definition in the form of little borders, this was simply achieved by doodling with a Copic Multi Liner (Black 0.3), the colour concentration provided by these liners will never disappoint, black is sooo black, I love it!


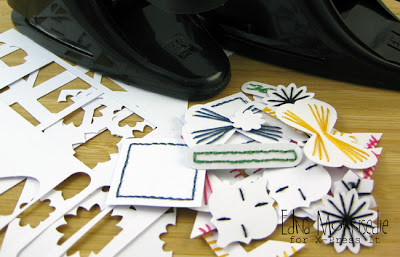
To carry the colour saturation theme, I punched a series of elements from X-Press It Blending Card to build embellishments.  Rather than cut into another piece of A4 I reached for a couple of pieces of my ever present X-Press It Blending Card Mini, they measure in at 9x15cm which is perfect for image stamping, and also for die cutting from Blending Card.  You can see my stack of little punched out card in this image, and you will also note that I have stitched through most of the pieces to add texture.


Because I used X-Press It Blending Card to make the punchies, adding extra colour to them is an absolute breeze, I just dribbled ink onto each one in the colour needed.  You can achieve the same colour saturation with a Copic Marker, it just takes a little longer, just keep colouring until you have achieved total saturation through to the back of the paper, you can still blend if you want to as well, but I opted for solid colours to keep with the bright feel of my little book…. Lots of possibilities, just start and see where your art takes you….


One other important note is with regard to the thread that I used, it was just simple embroidery thread, I wanted to show that you can:

  • Use a black thread and the ink will not interrupt the definition between the black and the colour you chose to saturate the card with.
  •  Use coloured thread, and the ink may deepen the colour of the thread a little, but when using lighter shades not to a point of obvious difference.
  •  You could also opt to just use one colour of thread, like all white or cream, and it will take on the colour of the ink to add tone on tone definition.

Then it was a case of adding the embellishments to the book with X-Press It Clear Gel Glue… I inserted some encouraging sentiments as a starting point, and then filled space with the punched embellishments.  You will note that my Multi Liner came out again, and there are a few little sprinklings of rhinestones and the like to finish off, but in general the only thing in this book is X-Press It Blending Card and Copic Various Ink.


Here are the X-Press It Products used in the tutorial today:
X-Press It Blending Card
X-Press It Clear Gel Glue
Copic Sketch Markers
Copic Various Inks
Copic Multi Liner Black 0.3
Memento Tuxedo Black Ink


I hope you enjoyed this tutorial and are encouraged to experiment with your X-Press It Blending Card…. I thought I wasn’t into bright, but I think I have just changed my own mind, enjoy... EDNA!
Pin It

Wednesday, January 30, 2013

Sailing Giftbox


Thanks for joining us at the X- Press It Blog for another adhesive loving project.... I used 6mm Double Sided Tape and Clear Gel Glue to transform a recycled box into a nautical flavoured gift box, using FabScraps Papers and Embellishments.  Here is what I started with today:

I opted to use a combination of papers on the different elements of the box today, both to see all the different sides of the papers in use, and to provide more interest, this is also a great way to use up half pieces of paper and the like.  I didn't clean or prepare the box (which is actually a box from the hospital that the "artificial joints (knees)" arrive in....) these boxes have a fabulous hinge lid, and they really are too good to throw away... here is how I applied the tape and paper to get things started:

Once the box was covered with all the different papers I closed the box to make sure it would take the folded paper on the edges, always good to check this before you progress with embellishing:

Then a very fast and rustic rub of brown ink across all of the seams and parts of the papers, this helps to blend where the papers meet, and bring all the different paper patterns together:

The on to the really fun part, the embellishments, I am a little addicted to colouring FabScraps Chipboard with Copic Markers, which is what I have done here again today.... it's really simple, and instantly dry... I also rubbed the coloured pieces with the same brown ink from above, helping again to blend the colour palette... and you can see a little nautical knot in there too:

From there it was as simple as applying each of the embellishments with Clear Gel Glue.  The pass of twine first, then the sentiment and Captain's Hat:

For the front flap of the box, I have stacked the Steering element with a FabScraps Button, and finished with a Brass FabScraps charm, love these!!!

This box came together really quickly thanks to the instant dry elements of using double sided adhesive tape... you could of course also use TripleTac on such a box, but I wanted instant instant instant today....


Here are the X-Press It products I used in my project today:
  • X-Press It Clear Gel Glue
  • X-Press It 6mm Double Sided Tape.
Here are the FabScraps products I used in my project today:
  • FabScraps Papers: Summer Lighthouse, Summer Nets
  • FabScraps Gone Sailing Word
  • FabScraps Captain Hat & Steering
  • FabScraps Brass Embellishment (Anchor) and Button
Thanks so much for visiting the X- Press It Blog today, I hope you have enjoyed seeing the papers and embellishments change a recycled box into a fancy packaging!
Pin It