Wednesday, April 24, 2013

A Mother Needs Pins & Needles

Thanks for joining us at the X- Press It Blog for another project... Today I am combining a lovely FabScraps Sewing Machine Album with some Fabby New Papers and putting them together with X-Press-It Adhesives.  I thought this would be a good Mother's Day Project.... Here is what I started with today:


I chose two different FabScraps Papers, just like a good bowl of ice-cream one is Chocolate and one is Vanilla.  They are lovely sewing themed papers and they were the basis for my colour scheme today as well... not to mention the lovely detailed front of the album was really calling out for the sewing machine to reflect a vintage model, black in all its glory!!

The Sewing Machine is coloured with a 100 Copic Marker, I used a swirling motion to get a little texture in the coverage, let's face it those antique sewing machines have a fair bit of character about them!

The next job was to adhere the papers, I did this with my trusty and never too far away TripleTac, it's just great for applying paper to chipboard, smooth and quick to dry, I just LOVE it!


Then it was time to prepare the embellishments.  I continued my theme of colouring the chipboard with Copics, adding cream twine to the thread elements, securing this with Clear Gel Glue.


The inside pages of this album have been set up to act as housing for pins and needles, I thought it would be nice to use this album instead of a pin cushion and as a mega-sized needle case... it comes together really nicely with black felt, which is simply adhered to the page with Clear Gel.  The little embellishments are also adhered with Clear Gel Glue.


I always like to leave the dressing of an album to the last, as this is what I enjoy the most, there are lots of nice little sewing element choices in the FabScraps Range, I can't wait to show you some of the others, but for today it was all about using the over-sized spool and scissors that came with the album and the Fabby Pins'n Needles Word, what a perfect fit this was for the front of the now Needle Case.

Once the elements are secured to the front, add the scissors with a piece of vintage lace to one of the D Rings to finish.

Here are the X-Press It products I used in my project today:
  • X-Press It TripleTac
  • X-Press It Clear Gel Glue.
Here are the FabScraps products I used in my project today:
  • FabScraps Papers: Chocolate, Vanilla
  • FabScraps Sewing Machine Album (including the big cotton reel and scissors on the front)
  • FabScraps Sewing Set: 2 Needles, 2 Cotton Reels, Scissors 
  • FabScraps Pins'n Needle word.


Thanks so much for visiting the X- Press It Blog today, I hope you have enjoyed the coming together of this project, it's great to combine FabScraps chipboard and papers and they work together so easily with the right adhesives!!
Pin It

Wednesday, April 10, 2013

Easter Cup Decorations.....

Hi everyone, its Tarrah popping in to share some fun Easter decorations I created with you. Thank you for joining me on the X-Press It blog today!!

Don't they look so cute with a couple of Easter eggs and some little chicks added to them?


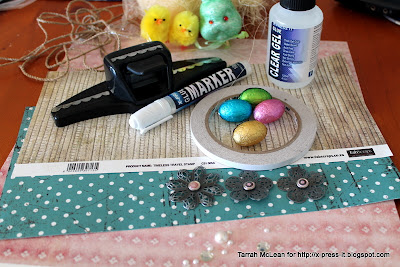
Here is how I created them....first of all I gathered all the products needed to create them.

Other products used:
Scallop punch
Metal ruler
Bone scorer
Big Shot and Circle and Scallop Circle Dies
Fibres
Easter Chicks
Easter Eggs


Start off by trimming the patterned paper to approximately 6cm x 30cm using your scallop punch down one of the long sides. Score with your scorer and ruler each scallop so that once you are finished you can concertine each one. Repeat for your desired number...


I n my case, I made three...you should end up with pieces looking like this once you have scored and folded/concertined your pieces.


From your Cuttlebug or Big Shot cut a scallop circle and a slightly smaller plain circle from all the different patterned papers and adhere the smaller circle to the scallop circle.....


Take your long pieces and bring around to meet each other so you have a circular 'cup' shape. The X-Press It Glue Marker Pen was perfect for this bit as it was a small piece to adhere together.
I found for this next bit that the X-Press It Double Sided High Tack Tape worked the best as you need a strong hold for the folds to stay in place on the bottom circle pieces. Adhere the 'cup' pieces using the High Tack Tape to the small circle bottoms making sure that your scallops are at the top...


Then you can go ahead and decorate how you wish, I added some wood fibres inside my little cups and added some coloured Easter eggs and some cute little chickens!!!


These were super easy to make and it made even more easy being able to create them using my favourite
X-Press It Adhesives and the gorgeous FabScraps paper ranges...

Thanks again so much joining me today on the X-Press It blog, I hope I have inspired you to create with your X-Press It and FabScraps products.....be sure to check back again soon for more inspiration from the X-Press It and FabScraps Design Team
Take care....
Tarrah x
Pin It