Wednesday, November 13, 2013

Angelic Christmas Layout

Sharmaine here with a layout featuring the Angelic Christmas range from Fabscraps 

IMG_9864

Products used:
FabScraps “Angelic Christmas” papers
FabScraps “Angelic Christmas” chipboard
Lindy’s Stamp Gang Embossing Powder
X-Press It Double sided tape
X-Press It Foam tape
Fabscraps pearls

After choosing my background paper (“Special Times”)
I pulled out a snowflake chipboard piece

IMG_9866

Using some double sided tape I adhered the chipboard to an acrylic block

IMG_9867

And stamped the image on my paper,
then embossing it with some “Silver Moon Sapphire” embossing powder.

IMG_9869

I then reused the chipboard

IMG_9871

By covering them with some paint, red

IMG_9873

and white,

IMG_9875

And then added some sparkle with gold nail polish.

IMG_9874

While this was drying I ripped a strip of paper from a piece of “”Blessed Times 1”

IMG_9865

And using this ripped shape as my guide I ripped slightly larger pieces from “Bauble Delight” and “I Believe”

IMG_9876

Once these were added to my page I stuck on the chipboard snowflake, to which I had spotted some snow (white nail polish).

IMG_9884

I then had fun colouring another piece of chipboard “Merry Christmas”.

IMG_9885

Adding more sparkle to my page.

IMG_9887

The end result…

SharmaineKruijver_XPressIt_Chrismas

A happy little reminder of Christmas time.
Isn’t the print on the pattern paper just gorgeous!
Dreamy even?!
I hope this post might inspire you to have fun creating.
Take care
Sharmaine

Pin It

Wednesday, November 6, 2013

Blog Hop Winners

First of all, we'd like to say a big THANK YOU to everyone who participated in the X-Press It Blog Hop...

The lucky 8 winners are:

X-Press It Blog #1 - Kerry From The Beautiful Barossa Valley
X-Press It Blog #2 - Jo Murray
X-Press It Facebook - Philipa Chang
X-Press It Instagram - Pipsicle007
Edna's Blog - Angie Brown
Sharmaine's Blog - Morgyn Mlinarek
Kate's Blog - Sammi
Anne's Blog - Jenny G

Please send an email to sascha@xpressgraphx.com.au with your postal details so we can send your TREATS!!Pin It

Vintage Glam TripleTac Style

Welcome to another X-Press It Tutorial, this week we are focusing on the use of TripleTac to transfer images to canvas.  Here is what I started with for the photo transfer element of this piece:


I used a fashion photo for my canvas by the very vintage-ly talented karen radkai, it spoke glamour to me, and I knew the muted tones would work well once transferred, and mesh nicely with a good splash of glitter.

You can print off any photo that you have and use the image transfer technique to achieve the same look.  There is a little video on the image transfer technique at this link, and the instructions are also provided on the side of the packaging on each tub of X-Press It TripleTac Glue.

The first step in the image transfer technique is to apply X-Press It TripleTac Glue to the image, apply a good coverage of TripleTac Glue, all the way to the edges of the image, and then simply press the image, face side down, onto the canvas.  Make sure the glue and image makes good contact with the canvas by running your hands across the top of the covered canvas and pressing firmly as you go.


The next step involves an overnight wait, or 3 hours in a warm environment... or you can do what I do and dry it with a heat gun.  The aim is to ensure that all the moisture leaves the glue.  Once you are confident that the glue has dried it is time to reveal the image...  This is simply achieved by taking the same paint brush, but dipped in water, and wetting sections of the covered canvas, then using your fingers to rub the paper backing away from the image.  It is best to work in small areas, re-wetting the areas as you move along, and slowly removing the backing paper.


Once you have revealed your image, which will be in reverse to what you printed, leave to dry for a while, once dry you will be able to determine if you have removed all, or enough of the backing paper. The amount of backing paper you remove is totally up to you, the more you leave on the more shabby chic your end result will be.


I chose this image with the intent of gifting a little "It's OK to be Glamorous" Canvas to a fashionista friend, and also because it had some specific details that would take extra bits of glam.  I wanted to feature the necklace and chose some silver beads from very deep in my crafting stash, applying a pool of TripleTac Glue directly atop the outline of the necklace on the image, then it was as simple as pooling the beads on top, waiting a few moments for them to settle and then tipping the canvas upside down to remove the excess.  TripleTac is super strong, so the beads will stay in place forever more!


Then for a little bit of different texture I took two different sizes in the Glue Marker and Glue Pen to the front of the dress, adding a thicker line across the top, and dots of glue on the frills on the front of the dress, spilling glitter glass in this section to adhere to the two different sizes of glue...


A quick quote printed and cut up to add a touch of sentiment and the elements of this were finished... you will note that I have painted the sides grey first, and then covered with silver paint, extending some of the paint to the front of the canvas to continue the shabby feel.


You can leave the canvas as is, in this case I wanted a gloss finish, so have gone back over the entire surface with TripleTac Glue, which now serves the purpose of a sealer.  This leaves a glossier finish, and also allows some of the colour from the original image to deepen again.


You could use your own photos, magazine images or scrapbook paper to transfer onto such canvases, the results are endless!

Here is what I used in my tutorial today:
X-Press It TripleTac Glue
X-Press It Glue Marker
X-Press It Glue Pen
X-Press It Canvas


Have fun with this technique, dig deep in the stash and see what you can find to secure with the amazing X-Press It TripleTac Glue and Glue Markers!

Thanks for tuning in, Edna.


Pin It

Thursday, October 31, 2013

Trick or Treat!?! Halloween Blog Hop!


Welcome to The X-Press It Halloween Hop! This is your chance to go trick or treating and win some X-Press It blog candy! You have 8 chances to win something from the X-Press It Jac O’lantern of goodies, like the new X-Press It Wide Glue Marker and Glue pen that I have used below! 


Simply leave a comment on each of the 5 blogs and our Facebook and Instagram pages. If you are just joining us on the hop, you are in the right place, this is the beginning! The next stop is Edna's Blog!

o   X-Press It Blog  TWO PRIZES!!
o   X-Press It Instagram (@xpressitau)

The hop closes at Midnight Sunday AEST (November 3, 2013) and is open to Australian residents only.

Thank you for stopping by, enjoy the hop and happy Halloween!Pin It

Wednesday, October 30, 2013

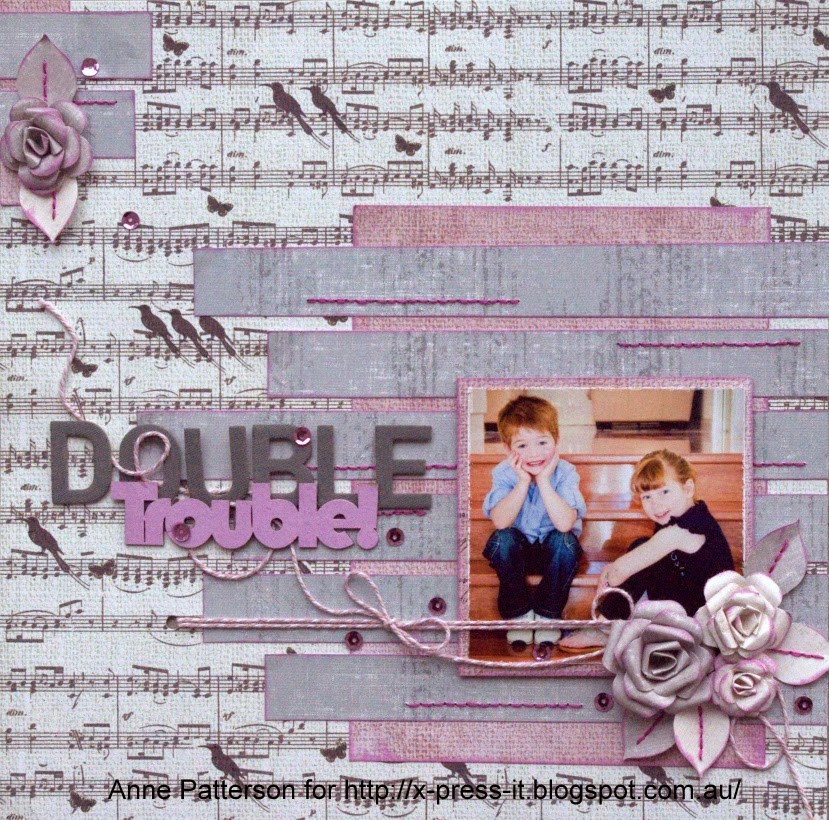
Making paper flowers using FabScraps Flower Kit and X-Press It Adhesives with Anne Patterson

Hi it is Anne here and I am happy to share with you a fabulous page I have made using the Fab Scraps Easy Peasy Paper Roses and X-Press it adhesives. 


They come in a range of different colours to suite almost any project, but of course they work REALLY well with the Fab Scraps paper ranges.

Step 1.  Punch out three of the same size flower (setting the centre aside).  Ink the edges if desired.


Step 2.  Cut a slit down one of the flowers, cut out one petal from one flower and two petals from the third.


3.  Using X-Press It double sided tape, adhere two petals of the flower together, so it is now a five petaled flower (creating a cone shape).


4. Repeat this process with your other two flowers, creating a 4 petal and 3 petal flower cone.


5. Taking  a skewer, roll the petals of your flowers.


6.  Using X-Press It Clear Gel, glue one of the centres into your five petaled flower.


7. Now glue the four petaled flower into the center of the five petaled flower.


 8. Add the three petaled flower into the center of the four petaled flower.


9. Take the two petals and one petal you cut out earlier, and curl and glue into the center of the flower.


9.  Repeat this process until you have the number of flowers you desire.


10.  Take out the leaves.


11. I have chosen to add some stitching detail to the leaves.


12.  Now you have finished your flowers and can use them in any way you wish on your project.


Products I have used in my project are:

X-Press It Double-Sided Tape 6mm 
X-Press It Double-Sided Tape 12mm
X-Press It Clear Gel Glue
FabScraps Shabbylicious Patterned Paper
FabScraps Pink Flamingos Patterned Paper
FabScraps Easy Peasy Paper Roses
FabScaps Die-Cut Chipboard Word Trouble
Here is my finished page.


I hope you can see how EASY PEASY this is and give them a go.

Anne
Pin It

Monday, October 28, 2013

X-Press It Glue Marker Test Drive

A couple of weeks ago, we made a call out on the X-Press It Facebook page, for some clever crafters to try and review the new X-Press It Glue Markers. If you missed it, we have added a Wide and Pen Glue Marker to the X-Press It Range. We are super excited to share our first review with you, from Natalie.

Natalie's Review

I had such fun playing around with the glue markers. After a bit of experimenting with different techniques I found that they work really well with my super-fine glitter. So I gathered a few supplies, including all 3 X-Press It Glue Markers and went to work creating these fun and simple cards.


For my glitter technique I started with the Wide marker. Using a ruler I 'drew' a straight line of glue across the bottom of my card, sprinkled it with glitter and shook off the excess. I repeated this process with both the Regular and Fine markers. At first I was concerned the Fine marker wasn't working as I couldn't see the glue, but it was soon revealed to be all ok when I sprinkled the glitter over it. It was just so fine I couldn't make it out! But this stuff is super-strong too, and doesn't have a problem keeping the glitter in place. I think this will also be excellent for doing really small detail work, like filling in parts of stamped images.


Well, that gives me more ideas now... so I'm off to play. Thanks for letting me test drive your new products. I'm definitely going to be using them more!

-Natalie

You can see more of Natalies work on her blog: https://www.facebook.com/onescrappydoctor or blog: http://onescrappydoctor.blogspot.com/

Pin It

Wednesday, October 23, 2013

A Glitter Pumpkin With a Twist!


Hi all, its Sascha from X-Press HQ! When I'm not working behind the scenes, I get to play with my favourite X-Press It products. Since Halloween is fast approaching, I have decided to make my own version of a Glitter Pumpkin. There are heaps of different ideas floating around Pinterest and similar websites at the moment, so I thought it would be fun to create a new idea and use X-Press It Double Sided adhesive sheets!

First I gathered all of my materials:
- A Pumpkin, I used a Kent (You could use any sort, like a Butternut or carving pumpkin)
- One X-Press It double sided adhesive sheet
-Glitter
-Scissors


Cut out your desired shapes from your Double Sided Adhesive Sheet, to form the face. I went with the triangles for my nose and eyes, then a stitched look for the pumpkins mouth. Find the best side of your pumpkin, peel one side of the backing paper off your cut outs and position them on your pumpkin and press firmly.


Carefully peel the other sheet of backing paper off. If you are going to use different colours of glitter for different areas, only peel the backing off when you are ready. I decided to do two different colours for the eyes, so I peeled the backing off, trimmed it, then repositioned it.


Now for the fun part! Add your glitter! Pour the glitter onto the exposed sheet and gently rub it in with your finger tip. Dust off any excess glitter. Make sure you are working over a surface that you can use to collect your excess glitter.


 This is how each area will look after you have added glitter. Repeat the same process for each different colour.


After I had glittered the pumpkins face, I decided that looked like a cat, so I cut out a set of ears and whiskers out of X-Press It Blending Card and completed the same process (Double Sided Adhesive sheets and Glitter!)

This was the final result! Hello Sparkly Glitter Pumpkin Cat!


I hope you have enjoyed my tutorial. Don't be afraid to leave a comment, we love to hear and see what you have been up to.

Happy Halloween! - Sascha

PS... A little birdy has told me to tell you that it would be worth your while to make sure you visit this blog on Halloween... *wink wink*

PPS Did you know that X-Press It is on Pinterest and Instagram!? Follow us, it would make me SUPER happy!

Pin It