Pin It
Tuesday, September 25, 2012
Masking with Mask-It
Pin It
Wednesday, September 19, 2012
I Heart Layers and Triple Tac!!!!
Hello again everyone!!
Tarrah with you today to show you how AMAZING the X-Press It Triple Tac is!!
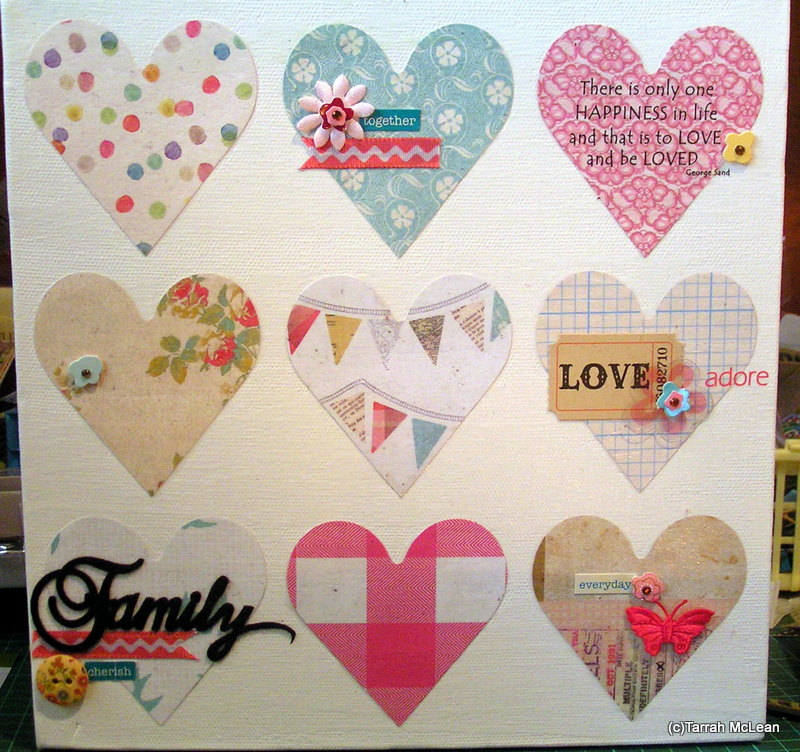
I love this stuff so much that I decided to make a layered canvas and what better way to show the love than to use hearts!!
First of all I chose some papers and the right die-cut size to suit my canvas.
Cut out your desired number of shapes using your preferred shape and die-cutter. In my example I chose to use 9 heart shapes....arrange these until you are happy with the design...
Now for the fun part!! Triple Tac is quite a runny product so you won't need a lot to apply to the back of each shape..
Apply a little to the back of your shapes and adhere in place...
This is where you can go crazy with it!!!! Next scoop out a big dollop with your brush and go for your life applying it all over the top of your canvas....
It will look like this when wet...now is a good idea to start layering with your embellishments while the canvas is wet from the Triple Tac because you can adhere everything down and it can all dry together....perfect!!
For my layers I have added rub-on quotes, ribbon, stickers, tickets, handmade buttons, word stickers etc
And here is the finished canvas all dry. The Triple Tac is so strong that nothing will be moving from that canvas in a hurry!!!!
So there you have it, you can easily create a canvas or any project you desire using Triple Tac, it is such a versatile product and you will be amazed at the strength and what you will use it for. Get your hands on some today!!
Thanks so much for stopping by the X-Press It blog today, I hope I have given you some inspiration to create your own projects using Triple Tac.
Stay tuned again next month for another exciting project and X-Press It product.
Have a great day,
Tarrah :)
Wednesday, July 18, 2012
Triple Tac--Paper Topped Canning Jars
This month I am demonstrating Triple Tac and its super powers when it comes to metal.... It's hard to get paper to stick to a metal surface without bubbles and post-dry lift, problem solved with Triple Tac, it is extra strong and virtually sucks the paper up against flat pieces of metal, and moulds the paper to the curves, I loved testing it on some Canning Jars!
My favourite colour is silver so the fact that canning jar lids come in two pieces is perfect for me, I can keep my beloved silver and still have colour co-ordinated tops for my button jars, here is what I started with...
The first step is to prepare the paper for pasting to the lid, it really is as simple as choosing your paper, making sure you have at least 1cm of paper bigger than the total size of the lid, you will see in my pictures that I have drawn two circles, the outer circle is the edge of the jar lid, the inner circle is where the ridge falls in the top of the lid.... to measure this I placed a piece of scrap paper on top of the lid and ran my fingernail in the groove. This is important because you want to take your cutting lines to the inner circle; cutting like this gives the paper room to mould through the groove and over the edge of the lid. So trace the circles, cut at random intervals to the inner circle, apply a generous amount of Triple Tac and then place the lid on top of the paper...
Gently press the paper to the lid, then flip it over and run your finger in the groove to move the paper into the groove space, then stretch each piece of spliced paper and tuck it behind the lid. Wait a minute or so, and then take a file to the edge of the lid to separate the excess paper, you could use your scissors to do this, but I like that filing takes off the paper right at the edge of the lid, and leaves a really smooth finish...
Once you have removed the excess paper, you can make a choice to leave your lids in two pieces or to join them together as I have done.... If you are gluing them together I would advise sitting the inner lid on top of the jar, then adding a run of Triple Tac right on the outer edge of the inner lid, I have used the red top to show you this step as the Triple Tac showed up better on this paper... Then screw the outer lid onto the jar to secure and, at the same time, align both lids so that they will always fit to the top of the jar. Only leave them screwed to the top of the jar for 30 seconds or so, just enough for the initial contact to start to dry.... then unscrew the lid and leave upside down to dry for a couple of minutes.... this just makes sure that any little bit of excess glue dries to the lid and not between the jar and the lid.
You can co-ordinate your papers like I have or just use papers that match whatever you plan to put inside the jars.... if canning jars are not your style, you can use this same technique on everyday jars, have a mish-mash set and cover them in co-ordinating paper and they will all of a sudden look like they belong together.... use the same jam every time.... cover the lids and you will have a little matching line-up of fancy jars.... enjoy!
Pin It
My favourite colour is silver so the fact that canning jar lids come in two pieces is perfect for me, I can keep my beloved silver and still have colour co-ordinated tops for my button jars, here is what I started with...
The first step is to prepare the paper for pasting to the lid, it really is as simple as choosing your paper, making sure you have at least 1cm of paper bigger than the total size of the lid, you will see in my pictures that I have drawn two circles, the outer circle is the edge of the jar lid, the inner circle is where the ridge falls in the top of the lid.... to measure this I placed a piece of scrap paper on top of the lid and ran my fingernail in the groove. This is important because you want to take your cutting lines to the inner circle; cutting like this gives the paper room to mould through the groove and over the edge of the lid. So trace the circles, cut at random intervals to the inner circle, apply a generous amount of Triple Tac and then place the lid on top of the paper...
Gently press the paper to the lid, then flip it over and run your finger in the groove to move the paper into the groove space, then stretch each piece of spliced paper and tuck it behind the lid. Wait a minute or so, and then take a file to the edge of the lid to separate the excess paper, you could use your scissors to do this, but I like that filing takes off the paper right at the edge of the lid, and leaves a really smooth finish...
Once you have removed the excess paper, you can make a choice to leave your lids in two pieces or to join them together as I have done.... If you are gluing them together I would advise sitting the inner lid on top of the jar, then adding a run of Triple Tac right on the outer edge of the inner lid, I have used the red top to show you this step as the Triple Tac showed up better on this paper... Then screw the outer lid onto the jar to secure and, at the same time, align both lids so that they will always fit to the top of the jar. Only leave them screwed to the top of the jar for 30 seconds or so, just enough for the initial contact to start to dry.... then unscrew the lid and leave upside down to dry for a couple of minutes.... this just makes sure that any little bit of excess glue dries to the lid and not between the jar and the lid.
You can co-ordinate your papers like I have or just use papers that match whatever you plan to put inside the jars.... if canning jars are not your style, you can use this same technique on everyday jars, have a mish-mash set and cover them in co-ordinating paper and they will all of a sudden look like they belong together.... use the same jam every time.... cover the lids and you will have a little matching line-up of fancy jars.... enjoy!
Pin It
Wednesday, June 27, 2012
Glue Marker with Twine and Embellishments
Hello everyone!! Tarrah here with you today......another fabulous trend going around at the moment that I am sure you have all seen is the bakers twine and handmade embellishments!!! So I thought I would share with you today how super easy it is to attach that said twine and some handmade embellishments using the all new X-Press It Glue Marker pen!!!!
When I first used the Glue Marker pen I was pleasantly surprised at just how much glue actually comes out of the pen so you don't need to use much at all!!!
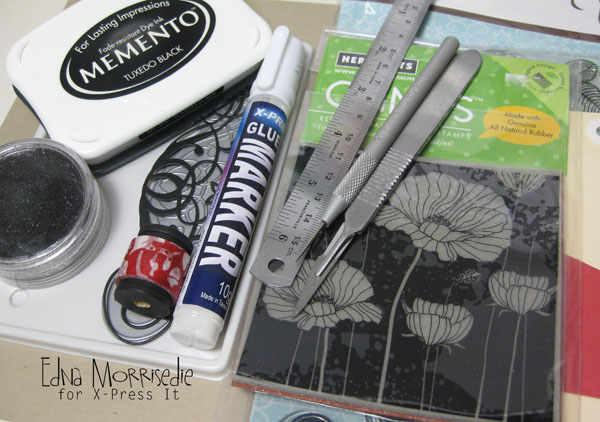
Start off by gathering some supplies you will be using......
Give the glue marker a good shake before using, press down and 'draw' your glue onto your embellishments...with these Kraft cardstock cogs and handmade embellishments I applied the glue to where the button was going to adhere to the cog and this then made it easy to move around my layout for placement before adhering the entire embellishment down.
The great thing is about the glue marker is that there is absolutely NO excess glue running out everywhere because you have been able to use just a small amount that's why it is so fabulous for embellishments and small bits and pieces.
Next I used the glue marker to adhere some twine to my layout and wow it did it with such ease.
I first placed the twine in the direction and shape I wanted and then all I did was lift the twine slightly and placed the glue in some strategic spots....just enough to get the twine stuck down without losing the shape and look I wanted.
Another top idea to use the glue marker for is if you have any embellishments or Thickers or stickers etc that may have lost there stick....the glue marker is perfect for these, you can just place a small amount of glue marker to the back of them!!!
Here is my finished layout with all the embellishments attached using the glue marker...
Thank you so much for stopping by the X-Press IT blog today, I hope I have inspired you to create something wonderful using the Glue Marker....whether it be a small project like a card or a big project like an off the page etc we would LOVE to see them, make sure you leave a comment and leave a link so we can pop on over and take a look at your work.
Stay tuned for next month.....we have lots more great ideas to show you all using the X-Press It products and there might even be a prize or two up for grabs as well!!!!!
Have a great day!!!
Tarrah :)
Pin It
Wednesday, June 20, 2012
Glue Pen Sparkles and Scrappy Delights
This month we are featuring X-Press It's newest delight in the very versatile Glue Marker. And a Marker it is, I love how it allows you to choose how you will layer the glue, either a thin veil for easy stick or a pool of glue for adding dimension.... you will see what I mean in the different applications of the Glue Marker in this tag tutorial....
I wanted to add glitter by way of scroll and flourish like embellishments and to add texture with some paper scraps, here is what I started with:
I die cut fine embellishments from black card and added very fine, sparkling black glitter to them, which was really easy thanks to the Glue Marker. It is as simple as drawing the glue across the face of the die cut, you get a much denser application of glitter if you allow the Glue Marker to sit as you apply it to the card, which will result in a slight pool of glue for the glitter to adhere to...
Pin It
I wanted to add glitter by way of scroll and flourish like embellishments and to add texture with some paper scraps, here is what I started with:
I die cut fine embellishments from black card and added very fine, sparkling black glitter to them, which was really easy thanks to the Glue Marker. It is as simple as drawing the glue across the face of the die cut, you get a much denser application of glitter if you allow the Glue Marker to sit as you apply it to the card, which will result in a slight pool of glue for the glitter to adhere to...
After stamping a double series of each of the two flowers from this reverse image, I chose two pieces of each flower to pop up, the popped layers are achieved with a combination of tiny pieces of Foam Mounting Tape (at the top of the petals) and a fine application of the Glue Marker (at the base of the petals)... the Glue Marker was fabulous for this, instant flat bond!!!
To add dimension to the centre of each flower and to tie in with the red elements across the card, I took a piece of scrap card and made it into tiny pieces of confetti, pooling the ink on top of the centre detail in each of the stamped flowers and then piling the confetti atop the glue, wait a couple of seconds and shake off the excess and you will have added a little more dimension to these flowers.
Once the sparkle is added to the flourishes and the flowers have been built it was a simple case of putting the tag together... I used the Glue Maker to attached the paper to the tag base, and to add each of the embellishments, it is super fabby on the fine details of the flourishes, a quick dab in a few strategic places and the glittering delights are all in place.
I hope you enjoyed this tutorial for the Glue Marker, it is a must for your tool kit, and has fast become my crafty friend!! Here is a detail shot of the glitter, flower dimension and confetti...
...until next time, enjoy!!
Pin It
Wednesday, June 13, 2012
Introducing the NEW X-Press It Glue Marker
Have you noticed the new confetti craze in scrapbooking lately? If you are a fan of Pinterest you will see it everywhere! I love the look but always found it hard to adhere the smaller pieces to my projects- until now!
X- Press It's new Glue Marker is the perfect size to adhere these itty bitty pieces. I created a card to show how easy it is!
Step 1 Gather your supplies including pattern paper, embellishments, hole punches and the X- Press It Glue Marker.
Step 2 Using your various sized hole punches punch some circles from cardstock and pattern paper.
Go a head and create your card from co ordinating card and pattern paper.
Step 3 Scatter the punched circles on your card and when you are happy with your card use the X- Press It Glue Marker to glue them to the card base. Its very easy to use and drys quickly and firmly!
and my finished card!
X- Press It's new Glue Marker is the perfect size to adhere these itty bitty pieces. I created a card to show how easy it is!
Step 1 Gather your supplies including pattern paper, embellishments, hole punches and the X- Press It Glue Marker.
Step 2 Using your various sized hole punches punch some circles from cardstock and pattern paper.
Go a head and create your card from co ordinating card and pattern paper.
Step 3 Scatter the punched circles on your card and when you are happy with your card use the X- Press It Glue Marker to glue them to the card base. Its very easy to use and drys quickly and firmly!
and my finished card!
I hope to see some confetti filled projects uploaded to our facebook page soon.
Kim
Pin It
Wednesday, May 16, 2012
Tissue Paper Photo Canvas
Hello again everyone!!! It's Tarrah here again with you today to show you a project that I just loved creating to share with you all.
It is of course using the X-Press It Double Sided Adhesive sheets!!!
Gather what you will need to create the project....a canvas (preferably A4 or smaller), a plain sheet of printer paper, X-Press It Double Sided Adhesive Sheet, white tissue paper, sticky tape, scissors, an inkjet printer with ink.
Begin by cutting your tissue paper to fit the A4 plain paper so the long sides are flush and so you have just a little bit hanging over the ends. Tape these overhanging sides underneath. I was using recycled tissue paper so at this point I gave it a VERY light iron with a towel over the top to smooth a few of the wrinkles (wouldn't that be good for our faces LOL!!!!!)
Once your tissue paper is cut to size, smoothed and taped down to the A4 plain paper, you then need to print your chosen photo....I have two options to print with my printer, from the rear tray or the cassette tray at the bottom and when I went to print it from the rear tray it was snagging the tissue paper (lucky it didn't rip!!) as its not all taped down so lucky for me I could use the bottom cassette where there was no snagging but I just had to be sure I knew what side the tissue paper needed to be on to print on the correct side.
Once the ink is completely dry, its just a matter of trimming the tissue paper away from the plain paper where you taped it down...because my canvas was smaller than A4 size this allowed me to cut it a little higher but for a true A4 canvas you would need to be more precise and cut closer to the tape.
As you can see in the photo below the tissue paper is quite thin and fragile so you need to be really careful when handling it in the next few steps!!!
Trim your double sided adhesive sheet to size and then place down firmly on your canvas, carefully tearing away the backing sheet......
Starting at one side of the canvas, gently lay the tissue paper photo down smoothing it out very carefully as you place it down, you will have a few wrinkles but it adds to the character....
This is how it should look when you have finished.....you can now paint a light layer of X-Press It Triple Tac over your whole canvas to seal it....being very careful.....
or you can embellish your canvas first
like I have done with my finished canvas.....I used some rub-ons from my stash to liven it up a little!!!
Thank you so much for stopping by the X-Press It blog, I hope I have inspired you to create something wonderful...we would love to see them!!
Make sure to leave a comment at the end of this post to be in the running to win a prize. Also be sure to check back in again next month for loads more cool projects and inspiration from us here at X-Press It!!
Tarrah :)
Pin It
Subscribe to:
Posts (Atom)