Showing posts with label Edna Morrisedie. Show all posts

Wednesday, September 16, 2015

X-Press It Mask It

X-Press It Mask It:
  • Low tack, flexible masking film
  • Soft peel, removes without residue
  • Matt finish, can be drawn on
  • Ideal for airbrushing, painting, stenciling and drawing applications
  • Can be cut by hand or with a blade
  • Great for manual die cutting.

Use X-Press It Mask It to build scenes with natural depth on your stamping projects.

Step 1: Stamp Images
Use a permanent ink to stamp images directly onto X-Press It Mask It, allow it to dry naturally before cutting out the images, which will be your masks for the stamping process.

Step 2: Stamp Foreground Images
Stamp the images that you want to sit in the foreground of your stamped scene
Here I have stamped a butterfly as the key image and the first run of grass at the bottom of the scene

Step 3: Stamp First Background Images
Place your hand cut masks over the stamped images, you can see in this photo that it is easy to line up the masks with the stamped images, and because the mask has been cut from an impression of the stamped image it becomes a perfect mask.  Stamp the round flower and second run of grass the your scene, the mask stops ink from over-stamping the images you have chosen for the foreground.

Step 4: Stamp Second Background Images
Apply the second series mask (round flower) to then provide another opportunity to place more flowers in a deeper background position in your stamped scene.

Step 5: Define Stamp Positions with Colour
The layers of the one layer image have definition because the stamps sit behind the feature images.
This is emphasised when colour is added to your scene, you can see here that the butterfly sits at the front of the scene and the grass sits to the front of the flower stems.

Mask It is easy to stamp, cut, and reapply time and time again, its soft nature allows for accurate cutting and easy placement in all stamping projects, its ultra-fine film allows for perfectly stamped impressions too!Pin It

Wednesday, August 19, 2015

X-Press It Glue Marker -- Ways to Use It

  • Acid Free & Xylene Free
  • Water based & Non Toxic
  • Clear Drying
  • Permanent or Temporary Bond
  • Suitable for glitter, flocking, embossing, masking and much more.

Application 1: Glitter
Run a glue marker at the edge of card and cover with glitter to add a sparkling border.
Write words with a glue marker and cover with glitter to bring the word to life.
A great way to add your own handwriting to your projects.

Application 2: Fabric and Ribbons
Secure the top of a piece of fine lace with a line of Glue Marker across the front of a card.
Follow the scallop of the lace with a Glue Marker for precision finishing on fabric elements.

Application 3: Rhinestones
Secure rhinestones that come without a sticky back anywhere on your projects with a dot of Glue Marker.
Making lines of rhinestones or scrolls of different sized gems is easily achieved with the same application of Glue Marker.

Application 4: Fine Paper
Cover a surface with Glue Marker and scrunch tissue paper across the front, the thin layer of glue is perfect for gentle application of fine papers and such.  In this sample I have applied the ink after securing the paper, so that the crushed paper picks up the ink.
You can also use the Glue Marker around the edge of a piece of card and lay the tissue paper down flat.

Application 5:  String
Scroll a line of Glue Marker across your project to add fine twine details.
Use free form scrolls, or add strings to balloons and such.  The Glue Marker's bond is strong, just hold in place for 20 seconds or so and the string will be secure enough to hold and dry in place.

Glue Markers are truly versatile and a must for your creative tool kit, I recommend one standard Glue Marker and one Wide Glue Marker to provide the versatility needed to achieve fine work and coverage for your projects.

This project is brought to you by EDNA Morrisedie.Pin It

Wednesday, July 22, 2015

X-Press It Stencil Sheets--Easy Lettering

X-Press It Stencil Sheets:

  • Low tack vinyl, removes without residue
  • Perfect for positive or negative masks
  • Extra thick, reuse over & over again
  • Suitable for hand cut stencils
  • Great for computer or manual die cutting
  • Use for airbrushing, painting, etching, sandblasting & more


Mix up lettering for stencilling using two different methods to cut X-Press It Stencil Sheets.  Choose a well known quote, or mix up a well known quote like the one chosen here.

Step 1:
Print lettering onto standard copy paper using a printer and cut out sections from a piece of an X-Press It Double Sided Adhesive Sheet to match the size of the lettering.
Peel the back off the Double Sided Adhesive and fix to the front of an X-Press It Stencil Sheet.


Step 2:
Peel the top protection sheet from the Double Sided Adhesive and secure the printed words directly to the face of the Stencil Sheet.
You can now hand cut the letters with a sharp pair of scissors to make individual letter masks for use on your artwork.

Step 3:
Cut alternative styled letters using a Die Cutting Machine and Letter Dies.
Cut the entire alphabet so that you have all letters on hand for future projects, keep them on the backing sheet that comes with the Stencil Sheets for easy storage.

Step 4:
Position your lettering onto a wood block, you can see the two different types of stencils in this picture.  Die cut remains the colour of the Stencil Sheet, hand cut looks like your printed letters as it has the letters stuck to the top of the Stencil Sheet with the Double Sided Adhesive.
Use washi tape as a guide line, rather than drawing a line with a pencil on your wood, makes  clean up easier.

Step 5:
Spray paint the wood and peel back the stencils to reveal the finished artwork.
Keep your stencils to use over and over again!
Make a single artwork, or a series of signs for a special event...

This project is brought to you by Edna Morrisedie.Pin It

Wednesday, June 24, 2015

X-Press It Clear Gel Glue--Ways to Use It

X-Press It Clear Gel Glue--Professional Quality Adhesive:

  • Water-based thick gel glue
  • Acid free & non-toxic
  • Dries clear & glossy
  • Fast drying
  • Not stringy - no mess
  • Extra fine applicator
  • Strong grip

Use on paper, cardboard, textiles, wood, metal, leather, foam, polystyrene and some plastics.

 Application 1
X-Press It Clear Gel Glue can also be brushed on to create a glossy finish. You can do this over the top of coloured chipboard, or like I have done here over the top of a stamped and coloured butterfly.  X-Press It Clear Gel Glue self-settles, so this means you can brush on and walk away and when you come back the surface will be smooth and void of brush strokes.  Simply wash brushes with water immediately after use.

Application 2
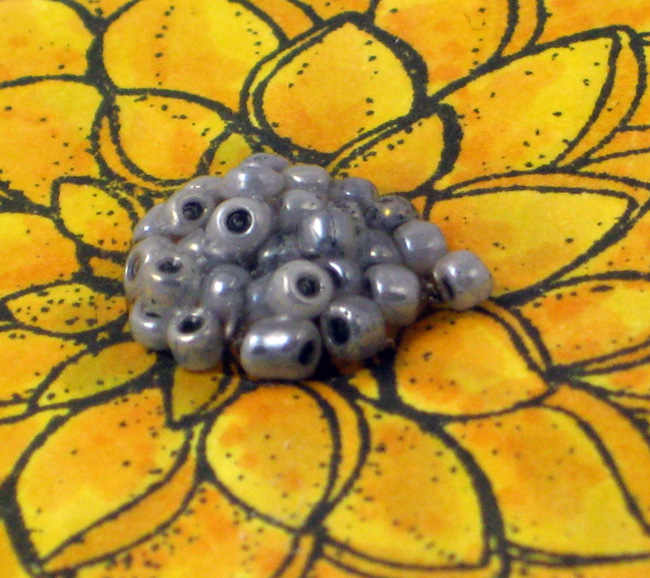
X-Press It Clear Gel Glue can be used to adhere small elements such as sequins and beads, or like I have done here to pile micro beads together to form 3D centres for flowers.  Simply squeeze a small pile of Clear Gel Glue and roll your beads into the glue before transferring to your project.

Application 3
X-Press It Clear Gel Glue is the perfect adhesive for small jobs too, the fine nozzle allows for pointed application like adhering multiple layers of a die cut word, which gives the effect of die cut chipboard and adds extra texture to your work.

Application 4
X-Press It Clear Gel Glue is fantastic with ribbon, yarn and twines of all varieties, apply strategically to hold in place, or cover your twine for an all over gloss effect.  Use Clear Gel Glue to items such as buttons and metal embellishments too.

Application 5
Importantly X-Press It Clear Gel Glue dries quickly.  Once I had built my elements and given the gloss a few minutes to dry, each element was secured to the card front with the same adhesive.  You only need to apply a small amount of X-Press It Clear Gel Glue to each element and position straight away.  For larger elements ensure air bubbles are removed by applying firm, even pressure, in moments your elements will be adhered!

This project is brought to you by EDNA Morrisedie.Pin It

Wednesday, May 27, 2015

X-Press It Tripletac Glue--Transfer Medium

X-Press It Tripletac Glue

  • Water based
  • Acid free and non-toxic
  • Dries clear
  • Fast drying
  • Matt finish
  • Excellent hold.


TripleTac glue is really a multipurpose medium that can be used on paper, canvas, cardboard, wood, metal, leather and some plastics, just like today's photo transfer onto a canvas.

Materials
X-Press It TripleTac Glue
X-Press It 6x6 Canvas
Paint Brush
Photo printed to size

Step 1:
Apply a generous coat of TripleTac to the surface that your are transferring the image onto (or direct to the photo).

Images printed from a laser printer (or patterned paper) will give the best result, however, images printed on a line printer will still work if you let dry overnight, or use a heat gun to set the ink.

Place the image onto the coated surface facedown and allow to dry (24 hours is recommended, or use a heat gun).

Step 2:
Using a small amount of water, gently rub the back of the paper with a wet finger or clot, until the paper starts to pill.

Continue wetting and rubbing until the image is revealed.

To avoid patchy results take care not to rub too much in the one area.

Step 3:
Apply a second coat of TripleTace to seal the image.

TripleTac Glue can transform each and every one of your precious memories onto a canvas, leave the canvas as a traditional photo, or dress with embellishments.

This project is brought to you by Edna Morrisedie.


Pin It

Wednesday, April 8, 2015

Pop & Shine with X-Press It Tapes and Glue Markers

It's time to use your basics to glam up simple stamped images for a card… you can have every fancy cutting tool known to man but a simple swipe of glue to hold glitter, and varied layers of tape to set different heights across your card front should never be underestimated!

All you need to start this simple project is X-Press It double sided adhesive tape and foam tape, in any width but I used 6mm, plus a trusty X-Press It Glue Marker, or Markers in my case… Importantly, select one part of your main stamped image and double stamp it, so that you can stack it up paper tole style… see below I stamped and cut out a section of the skirt on the pink dress… and then a separate banner and flower were also stamped and fussy cut:

 With the images as a starting point I cut a card base so that it had a 6mm overhang and run the Wide Glue Marker around the outside edge so that I could add a glitter detail to the outside edge of the card:

Once the base is all glittered up it is time to add tape to the different stamped elements, mixing up flat double sided tape with foam tape, and doubled up foam tape provides for different heights across the card.  If you look closely below you can see: single foam tape on the square stamped image and dress, doubled up foam tape on the flower elements and simple double sided tape on the banner:


When you place the skirt on top of the main image, and then the main image to the card front you get a nice lift for both of these, the largest elements of the card front:

Mix up the levels with a banner that is set flat against the base image, and then extra POP on the flower thanks to the doubled up foam tape:

Continue the sprinkling of shine by adding more glitter to the highest point in your card, the flower element:

A few extra sprinkles go a long way to bringing all the shine together… the dimension between the glittered edge on the card base and main image provide for maximum light to catch this little detail too:

So the next time you need a big POP on your projects, bring out the simple things in your stash, foam tape is a miracle worker for adding different levels of POP and Glue Markers the perfect base for added SHINE:


Enjoy the simple things and add to your justification for always having a good stash of X-Press It basics in your creative space… go forth and make simple SHINE!


Pin It

Wednesday, March 11, 2015

X-Press It Double Sided Tape: Tiny Envelopes

Well today is a little bit of fun, and a gentle reminder that all things are possible with the wonders of X-Press It Double Sided Tape, if you had nothing else left in your adhesive stash this little product will be able to solve all of your sticky situations!

I punched a few little envelopes from FabScraps Papers for today's mini project, it is great to use double sided papers for this as you get a pattern on the inside of the envelope as well:

All you need to secure the envelope is a run of 6mm Double Sided Tape on the lower edge of the two front flaps:

They secure nicely, firm and confident that they are going to stay:

Some little envelopes need some fun little messages, these little notes will be fun to send to a few little ladies in the post:

They fit nicely in the mini envelope and the tape holds the paper securely when the notecards are inserted:

When you have used fancy paper to make envelopes you want a simple but special seal for the back closure, today I have used simple white tissue paper with a strip of 12mm Double Sided Tape, simple press the tape onto the tissue paper and run your knife along the long edges to separate the tape from the sheet of tissue paper:

I like to rip my Double Sided Tape, and for the faux washi this is a great look:

It is not that I have run out of X-Press It Double Sided Adhesive Sheets, I always keep a good stash, but I thought I would show how quick you can build a little square of adhesive to cut out a die cut with a few passes of Double Sided Tape:

It cuts like butter and leaves little if any residue when pushed through a die cutting machine:

So the little tag lets me know which envelope is for which little lady, and there is no risk of the label falling off now that it is secured with Double Sided Tape:


This little group of messages is now ready for delivery, with thanks to X-Press It Double Sided Tape:


Today's little tutorial is a lesson in the basics, it's great to get back to multiple uses for your basic supplies, enjoy!


Pin It