Wednesday, May 9, 2012

Easy Stick is Easy Play

We are featuring X-Press It Double Sided Adhesive Sheets this month, and it really has been a pleasure to test drive these... perfect for paper crafting, they are super adhesive, yet easy to apply to card and they have a little bit of push and give when you place paper on top of the adhesive.  I even gently removed and repositioned paper strips a few times, that is an added bonus when you are using lots of bits of paper!

So this month I opted to demo some paper quilting, with the thought that this was a great way to showcase the adhesive sheets, but also to use up the plethora of scraps that we all collect from the fabby paper packs that we have.  I have shown four different types of paper quilting in this tutorial, all would be great to use, as I have done, straight up as backgrounds, and also to die cut into shapes for use on cards and pages.

Here is what I started with...

The first step was to prepare the background card.  I chose to adhere a whole sheet of standard white card to one of the A4 double sided adhesive sheets.  This is really easy to do, just peel back a few centimetres of the backing from the sheet...

gently place the card on top of the exposed adhesive, this secures the top section of the card

then it is as easy as slowly pulling back the adhesive backing and rubbing the adhesive to the card.  One whole sheet of card with adhesive will be good for 4 full card backgrounds...

The first paper quilt is Herringbone.  This is a great technique to use up small strips of paper.  In this example I have strips that measure 0.7cm 1.0cm and 1.3cm.
The strips don't have to match on both sides of the pattern, but I chose to do this this time.  To start you need to run one long piece diagonally across the card base.  Then one shorter piece each side to section as shown below...
From there simply take strips of paper and butt them up to the end point in each section, working through the section until there is no adhesive that remains exposed.
Once you have done this for all four sections, turn the card over and trim the ends to reform your original shape.
Then you can trim to the specific sized card front you need.  I show a card at the end of this post using this background....

The next background is what I have called Starburst, cut three pieces of patterned paper the same size as your adhesive sheet.  
Slice through all three layers at the same time, from the one corner point.  
Note this will give you enough paper pieces for three backgrounds, and allow you to mix your pattern as shown.  In this example, I edged each paper piece with white ink prior to adhering.  This helps to soften the joins.

The next background builds chevrons.  I cut squares, using a paper punch, from co-ordinating papers, slicing each square on the diagonal to form a series of triangles.  I inked the edge of each triangle with brown ink this time.
Place the triangles along a straight line across your adhesive sheet, off-set matching paper triangles against the first row to form your first chevron, repeat with co-ordinating paper triangles until your sheet is full.

The last paper pattern is what I call Brick Wall.  Simply take a series of patterned papers, all the same width, but cut into various lengths.  I edged mine with  my trusty Copic 100 to define the edges and help with the Brick Wall effect.
 Start in one corner, and lay the paper pieces across the adhesive surface, offsetting the joins along the way.

Here is a finished card with the herringbone background, I chose this open frame again to allow as much of the background as possible to show through...
Thanks for visiting us at the X-Press It Blog, I hope you enjoyed this tutorial for Double Sided Adhesive Sheets, tell us what you think by leaving a comment on one of this month's posts, one lucky commenter will win next month's feature product, which is the ever popular Clear Gel--Good Luck!!


Pin It

Wednesday, May 2, 2012

Creating your own sticky back die cuts!

Pre made Die cuts are all the rage now in scrapbooking as well there is a plethora of die cutting machines and dies to create your own. I wanted to share with you how I made my own sticky back die cut using X-press Its double side sheets-they are amazing just like doubled sided tape but they come in A4 size so you can cut a piece to any size you need. Lets start. First I chose a die that I wanted to cut out.

I then cut a square of pattern paper, slightly bigger that the die and then peeled back one side of the sheet and stuck my pattern paper down. I then trimmed around the edge of this.

Next I placed my die onto my die cutting machine and rolled it through.


I was left with my pattern paper cut into the shape I wanted and It had a sticky back.


I carefully peeled away the backing paper.


Finally I stuck my diecut down in the position I wanted! EASY.

..and Here is my finished layout.
 You can see I have layered my title and a few embellishments over the top of the die cut!


Thanks for popping by the X-press It blog. Rememeber as always if you leave a comment you will go in the running for a chance to win next month's product feature which is the ever popular CLEAR GLUE GEL.
Be fore I go I would like to announce lasts months winner Kasey in Oz- CONGRATULATIONS , If you could email Sascha -  sascha@xpressgraphx.com.au  to claim you prize for April.
I hope I have inspired you and I look forward to seeing the other girls projects in the coming weeks.
KimPin It

Wednesday, April 18, 2012

Chevron and Mask It...

Hello again everyone!!
Firstly I must say I am loving the great uses of the Mask It by Edna and Kim, beautiful girls!!

Tarrah here with you today to share a little off the page project featuring the X-Press It 'Mask It' to create a chevron pattern!!!

Gather the supplies you will be using...

I gave the door hanger a light sand to help with ease of painting.

Apply a background base colour, I chose white and applied about 3 coats of this...

so it ends up covering the wood quite well...

Take your Mask It sheet and with a pencil and ruler mark out and pencil in all your chevron lines...

using a sharp craft/stanley knife, carefully cut out each chevron shape so you have separate rows of masked chevrons

 As a practice I laid them down roughly where I wanted them to go on the door hanger 

I then peeled the masks away from the backing sheets and adhered them where I wanted them on the door hanger 

making sure they are all stuck down properly (you don't want any seapage underneath them), apply your chosen paint colour..

Let dry almost completely and then slowly and gently pull away the mask and this is how it should look.....

Once completely dry, decorate as you desire....

and here is my finished door hanger all ready to hang on my son's door handle.

Thanks for stopping by the X-Press It blog today.....we hope we have given you some hints and tips on how to use the Mask It product......don't forget to leave a comment for the month of April and a random winner will be chosen to win next months product feature.......a pack of the X-Press It Double Sided Sheets!!!!

Be sure to check back next month for the next product showcase. It will be another great month of inspiration with some lovely projects to share with you all.  
Pin It

Sunday, April 15, 2012

Cards and Masking..

Today I wanted to share a project I recently finished using Xpressit Mask It  sheets.

I began with an ampersand mask that I had in my stash but I wanted the masked section to be the negative of the shape not the outside.
So I grabbed a mask sheet and traced around the ampersand with a pencil.

I then carefully cut out the shape with a craft knife.

 I peeled the backing off and carefully placed it onto my pattern paper then lightly sprayed with my mist. I let it dry for a minute and then carefully peeled off the mask sheet to reveal the ampersand.
I completed my card with some co ordinating papers and embellisments.


We have a prize again this month... leave us a comment  for your chance to win a pack of X-Press It Double Sided Adhesive Sheets--our feature product for next month!

We will randomly choose one commenter from this month's posts to win this  prize!
KimPin It

Wednesday, April 11, 2012

The Mystery of a Mask

This month we are featuring Mask It, when they say this is a masking film they really mean it, which is the best thing about this product!  Many masking products are just too thick to use with stamps and the like as they have too much of a lip, which inhibits the stamp expanding across the full opening… added to this…. it cuts like butter!  So much so that a light pressing with a scalpel slices through the backing paper and the masking film, THANKFULLY as there was a fair bit of cutting in my project today!
I added a damask design to the front of a two drawer storage unit, this is one of the flat pack ply drawers from IKEA, mine was already assembled, if you are doing this from scratch it will be a lot easier to apply the design before assembly, I have worked around that today thanks to the flexibility of Mask It.
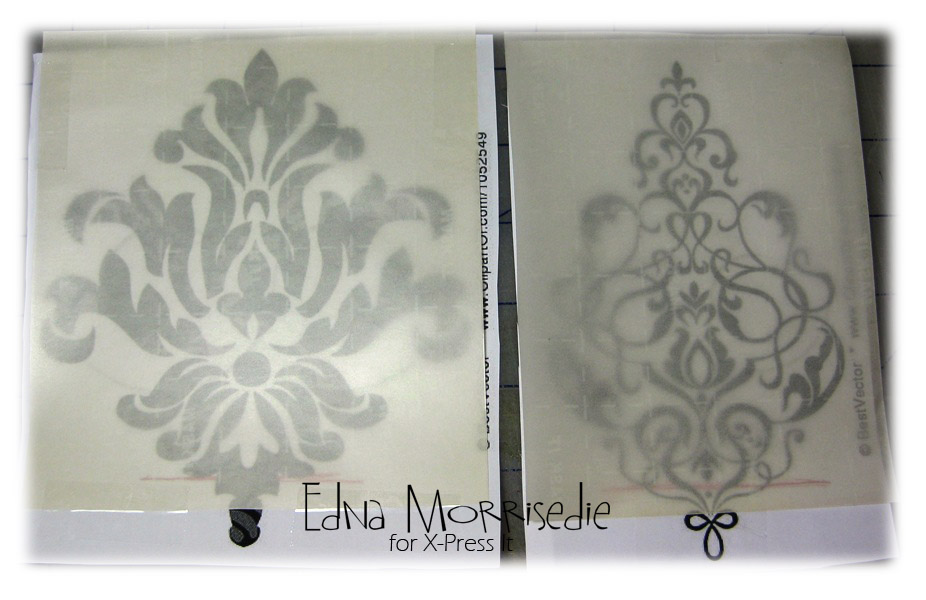
Building a mask is as easy as choosing an image, this could be an extension of an existing stamped image, something you draw up yourself, or do what I did and search for images in the style you are looking for.  I simply Googled “Damask” to choose my design today, and found two damask designs that fit inside one another.  I used the entire broader image and a selection of the finer image.

I stuck the Mask It to my design with sticky tape to keep it in place for the cutting stage.  This is the most time intensive phase of masking, however, is well worth the effort as you will have the mask ready for multiple uses.


When it comes to applying your mask don’t worry too much about exact placement the first time, one of the great features of Mask It is its low-tack adhesive, it moves around easily and sticks when you need it to.  If you plan on repeating your design on elements that need to align, like side by side drawers, it is best to establish a marker.  In this case the peak of the damask sits just below the centre drawer pull notch.

I used a stipple brush and a dry coating of red paint for the base design, I find multiple light layers of paint best for this type of design.  If your paint is too wet you won’t get an even application, just dry off your brush on scrap paper in between applications….

After applying the red paint, I left the mask in place and covered the red design with stamped text.  I used an acrylic stamp for this, with cream paint, you can also use permanent ink.  I wanted the text to be a little rustic, so I rubbed off some of the cream paint with a paper towel before pressing the stamp across the design. 

Once happy with the double application of paint, I removed this mask and applied the finer detail damask mask. 

Using the same method I then applied the pink paint to the drawer front.

Simply repeat the steps on the other drawer and your design is finished.

Save your masks for future use… I am going to try airbrushing with mine next!  That will be right after I cut out a die cut frame and build a shadow for a detailed die cut on a card... endless uses...

We have a prize again this month... Show some love for your chance to win a pack of X-Press It Double Sided Adhesive Sheets--our feature product for next month!

We will randomly choose one commenter from this month's posts to win this fabby prize!

Pin It